This section will introduce the reader to some basic portal concepts and terms, used within JBoss Portal and this document.
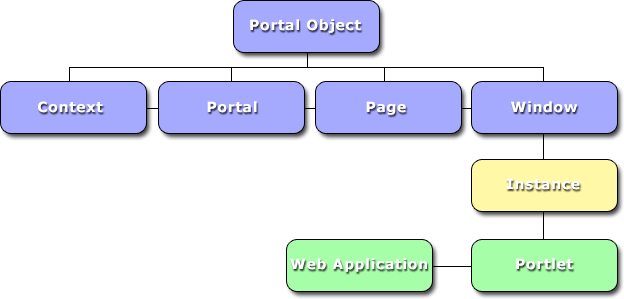
JBoss Portal supports multiple portal instances running within one container. A portal instance can be viewed as a 'bucket', containing portal objects such as, Portal Pages, Themes, Layouts, and Portlet Windows. It also manages the relationship between the user and the portal itself. The hierarchy of portal objects is depicted as follows:
A portal instance is reachable by the url format http://[domain]/[context]/portal/[portal_name] . In a default/local install, the default portal instance can be reached at http://localhost:8080/portal/portal/default .
Note
Consult your portal administrator for information on the available portal instances - some of which may have restricted logins, not found in others.
A Portal Page is an aggregator of Portlet Windows. It is generated by the portal, during the reponse phase. During this phase, the portal aggregates all of the HTML markup created the individual portlets, decorates them with window controls, and presents them to the user as a consolidated page.
A portal page is reachable by the url format http://[domain]/[context]/portal/[portal_name]/[page_name] . In a default/local install, the default page can be reached at http://localhost:8080/portal/portal/default/default . Likewise, the News Page in a default install can be reached at http://localhost:8080/portal/portal/default/News .
More, on navigating the portal pages and what they contain can be found in, Section 1.2, “Default Portal installation”
Portlet Windows are found on Portal Pages and contain the HTML markup for a specific portlet instance.

The diagram above, shows the default JBoss Portal page with certain window-related items highlited (in red). Lets look at these items:
Window Title: Defines the content and purpose of the individual portlet window.
Window Fragment: Generated HTML markup produced by the portlet on the server-side.
Window Controls: Window controls are divided into two categories and control different aspects of how the user can impact the generated markup. Each window control can be clicked on to interact with the window in specific ways. Window State icons control how much room the window will take on the page and how much markup will be shown. Portlet Mode icons, on the other hand, control the mode in which the portlet operates, thus impacting the type of generated markup. Note that not all portlets support all defined window states and/or portlet modes.
Window State icons and their meaning:

(Normal) - Normal window state, is the most common state for portlets (portlets in the above image are in the normal window state). The portlet window will occupy only enough space to show the portlet content on the page.

(Minimized) - The portlet is instructed to render minimal-to-no markup.

(Maximized) - The portlet window can occupy as much space of real estate on the page.
Portlet Modes and their meaning: Portlet modes are not always available (it depends on the portlet support for a given mode). Moreover, the Edit mode is only available to logged-in users, as in this mode, the portlet preferences can be modified to be individually suited to a particular user's needs.

(Edit) - Only visible to logged-in users. Allows a logged-in user to customize the portlet's preferences.

(Return to View mode) - The button labeled 'Cancel' is only visible when a user is logged in and the portlet associated to the current window is in the Edit mode. This replaces the Edit button so the user understands that by clicking it she will leave the "Edit Mode" and reverting back to "View Mode". Portlets are by default in View mode.

(Help) - Allows a user to access helpful information about the portlet, if it provides it (which is recommended).
This section will take a quick look at the default Portal installation and the pages and portlets that come with it.
Three pages are available in the default Portal: Home, News and Weather. You can access pages either by entering the page URL in your browser location bar, as shown in Section 1.1.2, “Pages”, or by clicking the tab associated to the page in the Navigation Tabs at the top of the page.

Note
Navigation tabs support sub-page navigation as well. By hovering over a tab with child Pages, it will display a flyout menu for those subpages:
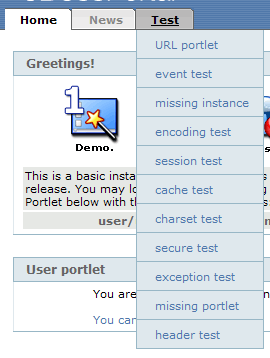
There are no pages with subpages in the default Portal installation.
While you can use a Portal anonymously, it is much more interesting to do so while logged in, as you get the opportunity to customize the content you want to see or even create your own personal Dashboard, as explained in Section 1.3, “Personal Dashboard”.
Logging in to the portal is accomplished by clicking the Login link at the top-right of the portal page. Portal will present you with a logging screen where you can enter your credentials:
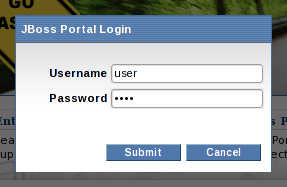
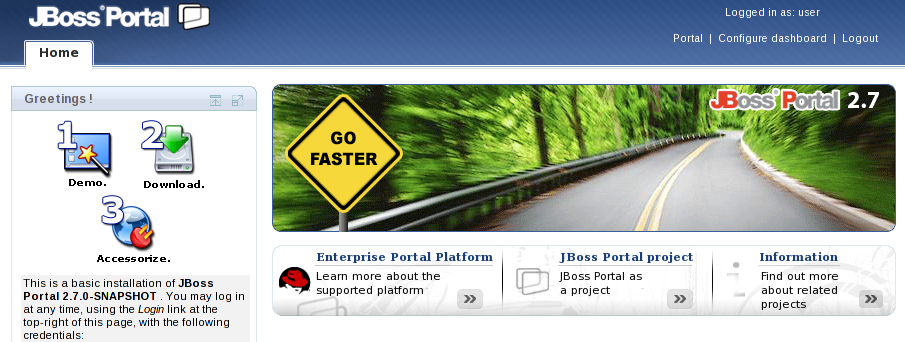
The default Portal installation
defines two users: a regular user with no special privileges
(login: user, password: user) and an
administrator user who can alter Portal's content (login: admin, password:
admin).
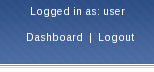
Once logged in, the top-right menu will change so you can then navigate to your personal dashboard or log out. If you have access to other portal instances, they will be shown here as well.
Note
If you login as an administrator, you will also be presented with a link to the Admin portal.
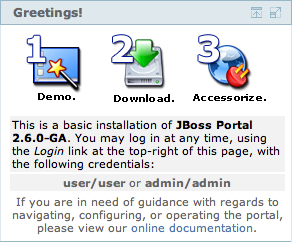
Displays hard-coded links to downloading JBoss Portal, downloading portlets from PortletSwap, and the live online JBoss Portal demo. It also contains default authentication information on loging in, as well as a link to the official Portal documentation.
Note
Administrators should view Section 4.1, “Managing Users” for managing the portal user base. Only user operations are covered in this section...
Once successfully logged in, the user will have additional functionality at his disposal, that is covered in the following sections.
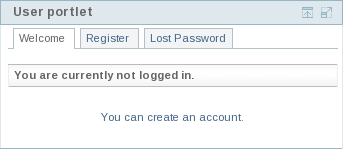
The Identity User Portlet allows a user to:
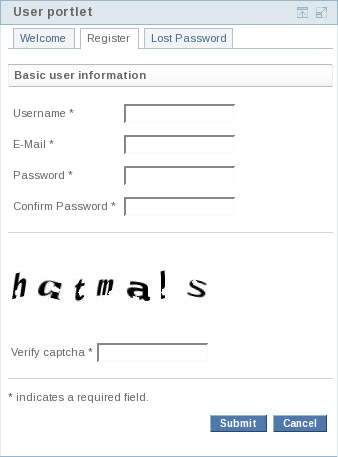
Create a new account
Create a new account by clicking on the "Register" link in the navigation of the portlet, when not logged. A User can then fill in the necessary information to create an account on the system:
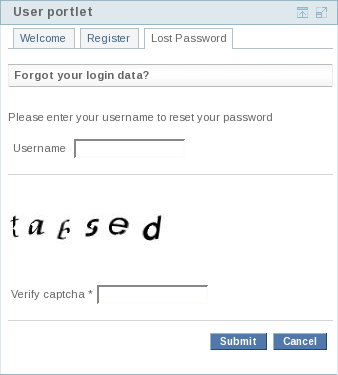
Lost password
Already registered users can request a new password by clicking on the "Lost password" link in the navigation of the portlet. Therfore the user needs to fill in his user name to receive an e-mail with his new login credentials.
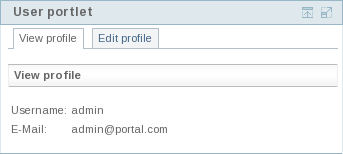
View profile
The default page after login is the view profile, which shows a summary of the most important properties of a user.
Edit personal information
A user has the ability to edit his personal information, change his password and e-mail address at any time by clicking on the "Edit profile" link, when logged in.
Portal includes a basic Content Management System (CMS). Portal provides a CMS portlet which allows users to navigate the CMS content (static html, images, binary files, etc.).
Displaying content is done by the portal using a path mapper. For example, if we wanted to display a zip file, located in /default/foo/bar.zip, we would type in the URL http://localhost:8080/content/default/foo/bar.zip. Notice how the path to the content, is prefixed with the '/content' term. Although in this example we are describing binary content retrieval, the same is to be said for text/html files. Keep in mind, however, that binary files are displayed outside of the portal pages, but text/html are displayed inside the CMSPortlet Window.
Serving Logic: The CMS Portlet now serves content based on the user's locale setting. For example: if a user's locale is set to Spanish in his browser, and he requests URL: default/index.html , the CMSPortlet will first try and retrieve the Spanish version of that file. If a Spanish version is not found, it will then try and retrieve the default language version set for the CMSPortlet (set to English, by default).
Note
Administrators should read Chapter 3, Administration - Content Management System for managing the data in the CMS.
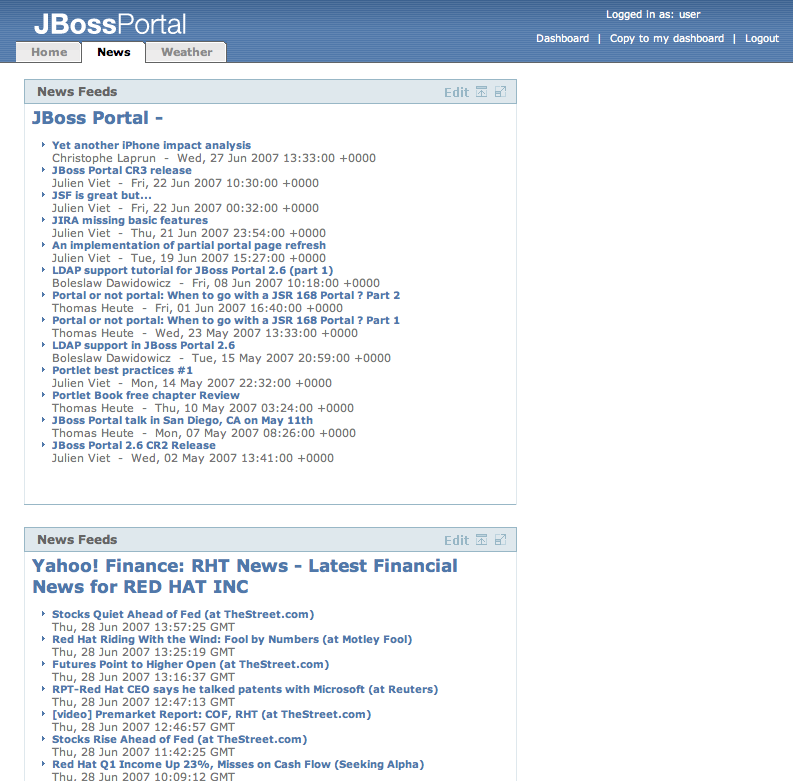
The News Page contains 2 portlets displaying news from common internet feeds. An open internet connection on the server-side is therefore required for them to operate. ;-)

The News Portlet retrieves an RSS news feed from a URL and displays it as HTML to the user.
Additionally, a logged-in user is able to modify her preference in RSS feed source by using the Portlet's Edit Mode (click
). Once the form is submitted, this property will be saved in the user's preference, so she will always see the same news source, when logged in.

Note
This portlet is capable of handling most RSS 1.0 and RSS 2.0 feeds.
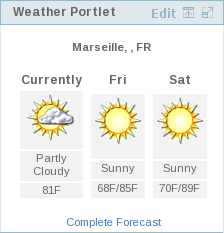
This page contains a portlet displaying the weather forecast for a specific location.
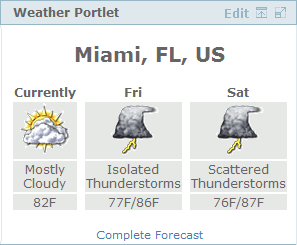
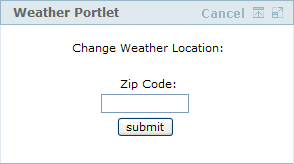
The Weather Portlet retrieves an RSS weather feed, based on a key (commonly a US Postal Code), and displays it as HTML to the user.
Additionally, a logged-in user is able to modify her preference in location by using the Portlet's Edit Mode (click
). Any valid US Postal Code can be input here. Once the form is submitted, this property will be saved in the user's preference, so she will always see the same weather data for her location, when logged in.
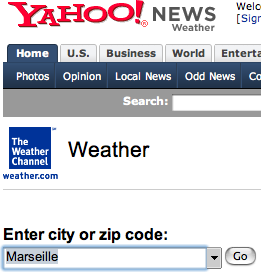
Not in the United States? Follow these steps to configure the Weather portlet to display information for your area.
Enter your city name in the location field, found on the page:
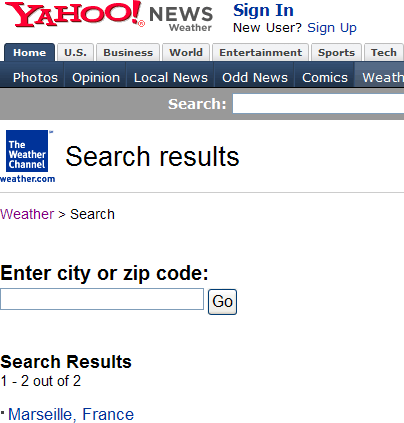
Find your location on the list under the form and click on it (Marseille, France, in this case):
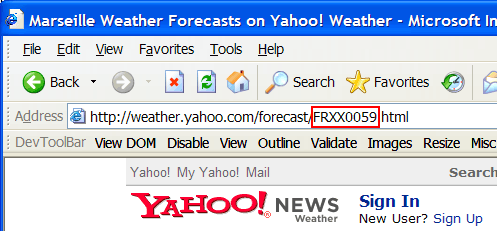
Copy the location digits from the address bar in your browser (FRXX0059 in this case):
Paste these numbers in to the weather portlet edit form (FRXX0059 in this case):
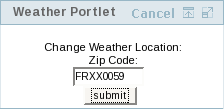
Hit submit...
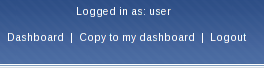
Once logged in, all users/administrations of the portal can access a personal dashboard by clicking the Dashboard link at the top-right of the portal page. Note how the links changed.
The personal dashboard allows users to customize their portal pages however they like, and all changes will be persisted... so the next time the user logs in to his dashboard, he will see the previous changes he made. While navigating any of the dashboard pages, a user will be able to drag and drop portlet windows to any location, if the administrator allows this functionality. Changes made in this fashion will also be persisted.
It is also possible to copy the content of a shared page to your dashboard so you can customize it to your liking. Just click the 'Copy to my dashboard' link at the top right of the page. This will clone the page and add it to your personal dashboard as a page with the same name.
You can configure your dashboard by using the top-right menu item labeled 'Configure dashboard':
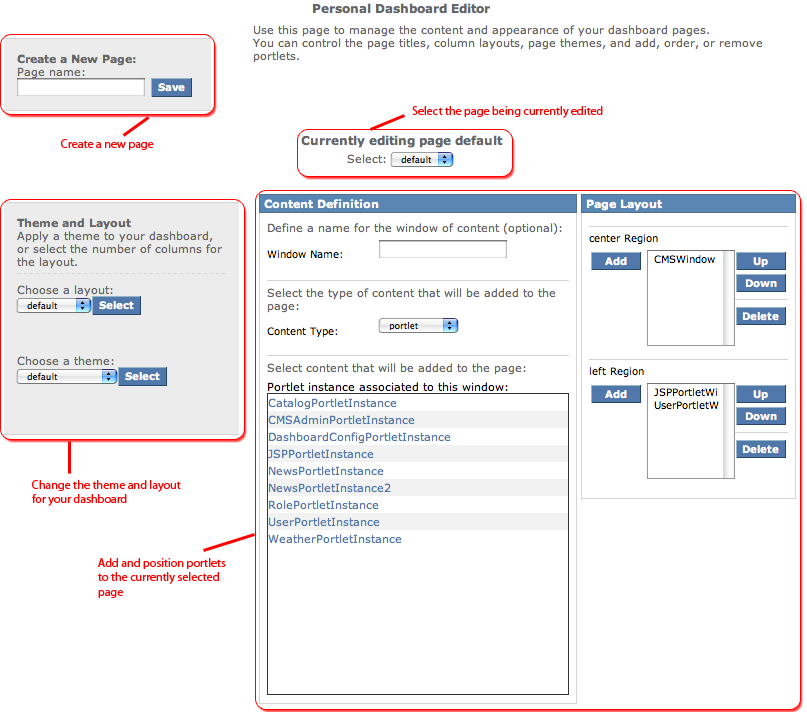
You can select a theme and layout for your dashboard by selecting from the available ones and then clicking on select in the Theme and Layout form.
You can also create new pages that will be added to your dashboard by simply entering the name of the new page in the Create New Page form at the top left of the screen.
Note
Page names must be unique.
Page names cannot be blank.
Upon creating a new page, the screen will refresh and allow a user to customize the new page.
You may delete dashboard pages at any time, by first selecting the page you want to delete using the popup menu at the top of the screen and then clicking the Delete this page button at the bottom of the screen. We will note that users are not able to delete the default dashboard page.

Warning
Deleted pages are NOT recoverable. This change is permanent!
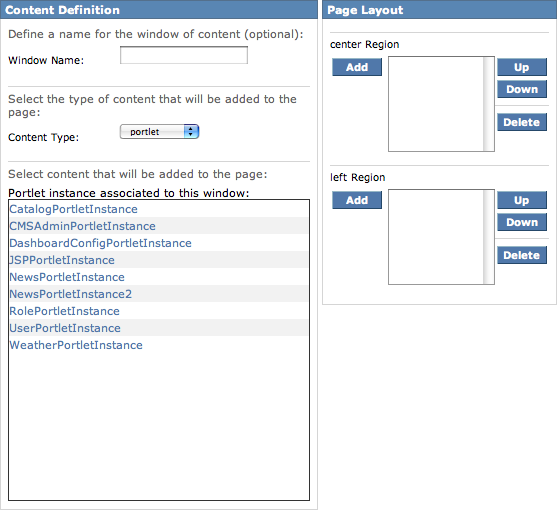
You can add, remove and reorder portlets on a dashboard page to adapt your environment to your liking. To do so, just select the page you want to modify using the page popup selector and use the portlet management form. We will not explain how to use it here as it is similar to the page layout functionality of the Admin portal, which we will look at in Section 2.2.1.3, “Looking at a page configuration”
Note
You must be logged in as an administrator, or have proper privileges to see this portal.
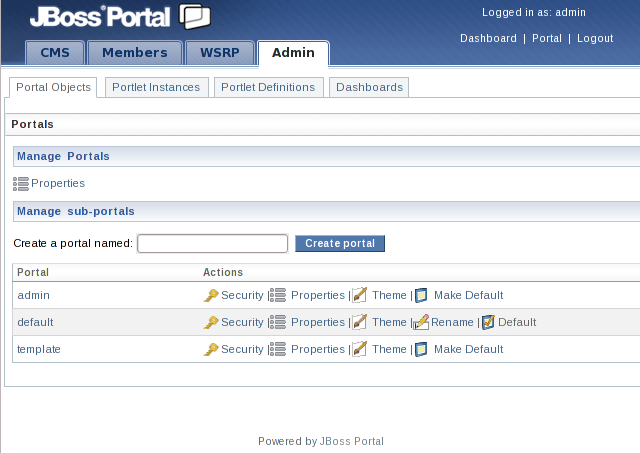
The Admin Portal's purpose is to allow an administrator to manage all aspects of the portal. Follow the links for in-depth reviews of these functions:
Users/Roles (See: Section 4.1, “Managing Users”, Section 4.2, “Managing Roles”)
Content Management System (See: Chapter 3, Administration - Content Management System)
Portal Objects (themes, layouts, portal instances, pages, windows, security, and deployed portlets) (See: Chapter 2, Administration - Portal Object Management (Dynamicity))
WSRP (See the WSRP chapter in the Reference Guide for more information)