- 3.1. Overview of JBoss Server Tools
- 3.2. Features of JBoss Server Tools
- 3.2.1. Features Overview
- 3.2.2. Download a JBoss Community Application Server
- 3.2.3. Define a Local Server with Runtime Detection
- 3.2.4. Create an Additional Server Runtime Environment
- 3.2.5. Define an Additional Local Server
- 3.2.6. Define a Remote Server
- 3.2.7. Manage Server Settings
- 3.2.8. Manage Server Settings in Overview Mode
- 3.2.9. Manage Server Settings in Deployment Mode
- 3.3. Customizing JBoss Server Tools
JBoss Server Tools is tooling for working with application servers in the IDE. It extends and enhances the existing server functionality of the IDE.
JBoss Server Tools consists of wizards, editors and actions that enable you to define, configure and manage application servers.
For assisting in defining servers for IDE use, JBoss Server Tools provides runtime detection. This feature locates installed application servers and integrates them into the IDE ready for use. Additionally, you can define remote servers for JBoss community application servers in the enhanced New Server wizard, which integrates with the IDE Remote System Explorer (RSE) tool.JBoss Server Tools also allows you to download JBoss community application servers from within the IDE.
Extensions to the standard IDE New Server wizard and server editor allow you to specify and customize more management and behavior settings for servers. Settings include IDE interaction with servers such as launching, communicating and publishing. The JBoss Server Editor supports you in managing applications for the server as a whole and individual modules.
JBoss Server Tools actions enable you to customize based on application server type, such as default filesets added to new servers and classpath filesets. You can also customize the default server used for IDE actions such as 'Run on Server'.
The aim of this section is to guide you in using JBoss Server Tools:
Download JBoss community application servers from with the IDE
Use runtime detection to locate installed application servers and generate complete server definitions, making them ready for IDE use
Define custom configured servers, both local and remote, by creating additional runtime environments and server adapters
Manage server configuration and specify IDE-server interaction with the JBoss Server Editor, including settings such as launch options, publishing frequency and communication ports
Application servers must be installed on your system in order to deploy applications to local and remote instances of them. Many application servers must be downloaded from outside the IDE. But JBoss Server Tools can assist you to download JBoss community application servers from within the IDE, as detailed in the procedure below.
Procedure 3.1. Download a JBoss Community Application Server
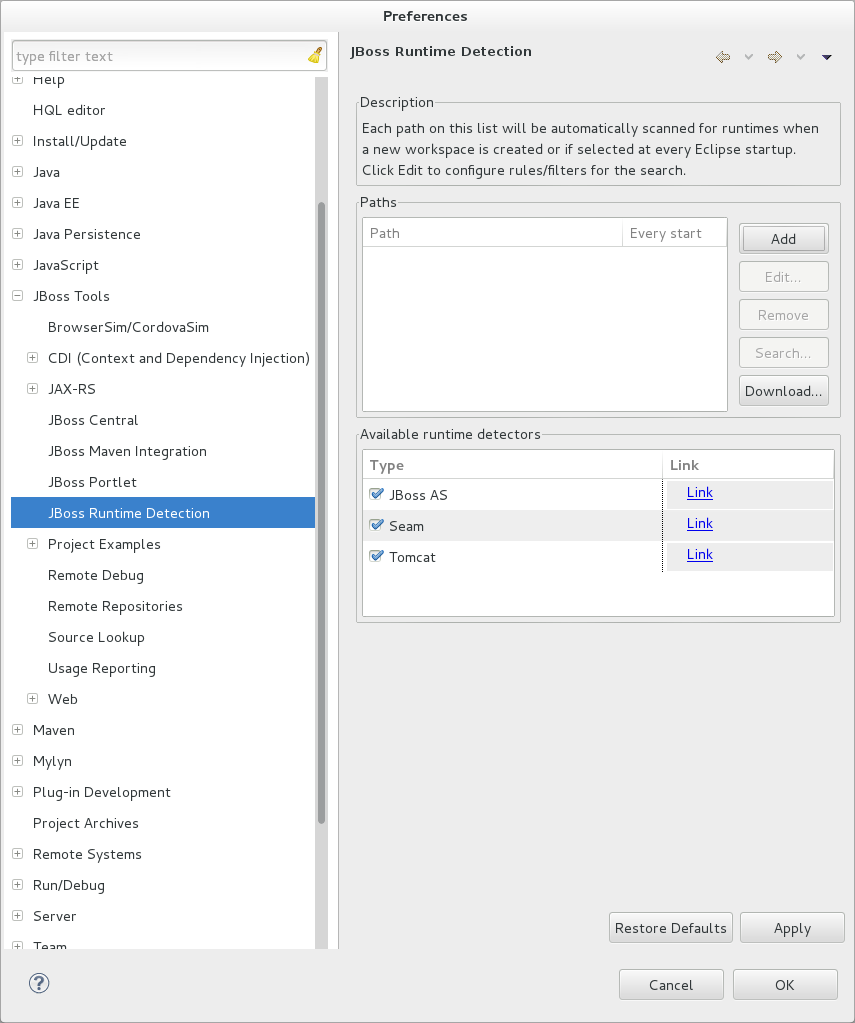
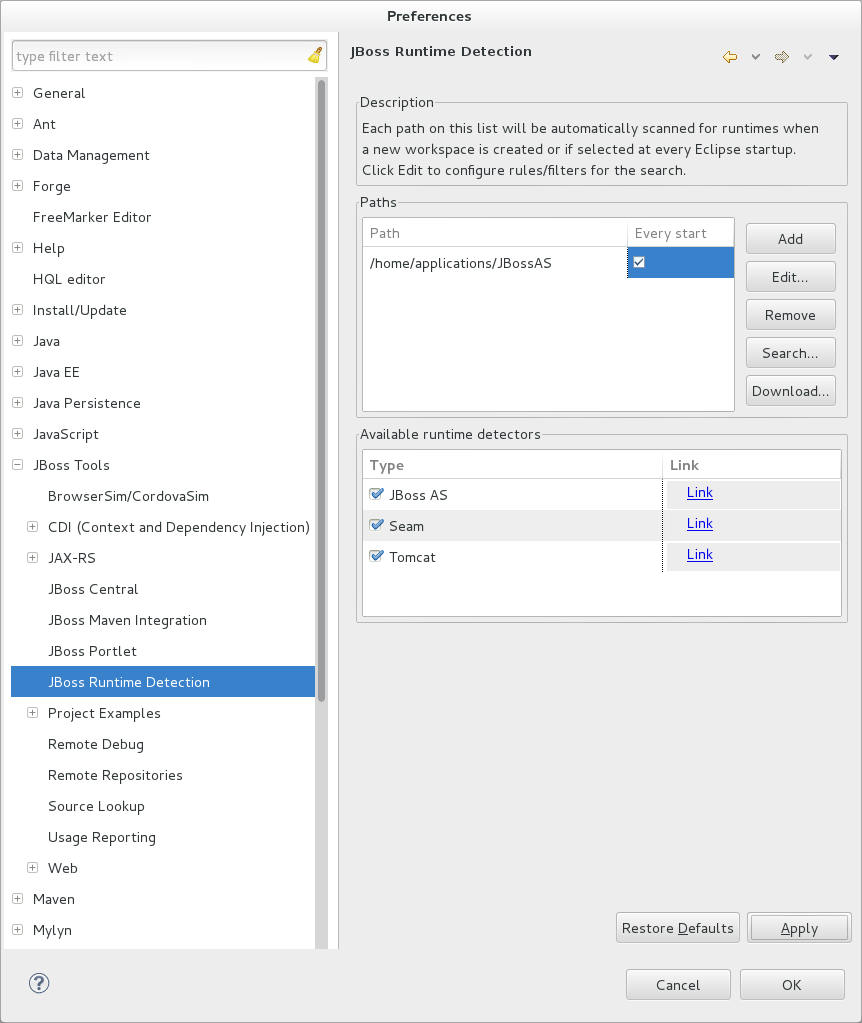
Click →, expand JBoss Tools and select JBoss Runtime Detection.
Click .
From the table, select an application server and click .
After reading and agreeing to the terms of the license, click I accept the terms of this license agreement and click .
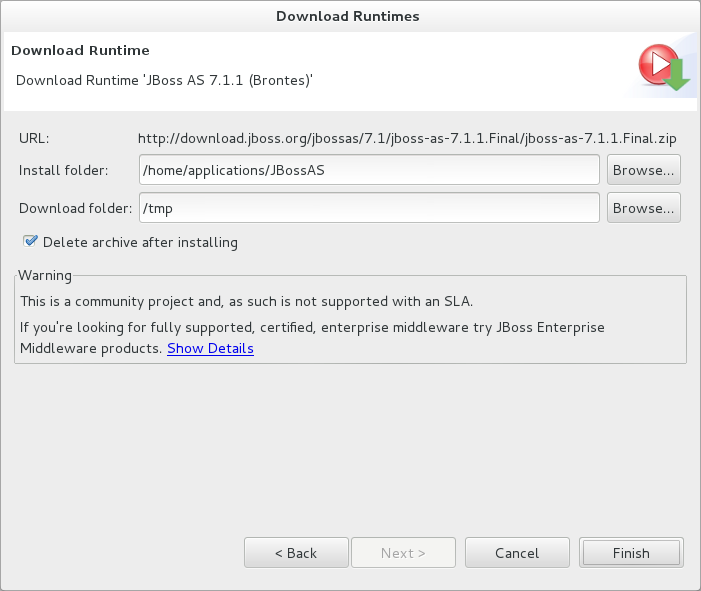
In the Install folder field, type the path in which the downloaded application server should be installed or click to navigate to the location.
In the Download folder field, type the path to which the application server should be downloaded or click to navigate to the location.
To automatically remove the downloaded archive after installing, select the Delete archive after installing check box.
Click to commence downloading and installing. The IDE progress bar and Download window show the progress of the download process. You can click to close the download window and continue the download process.
Click to close the Preferences window.


Once downloading is complete, the application server archive is extracted and several automated actions occur:
The path of the application server is added to the runtime detection Paths table.
A default server runtime environment is generated for the application server.
A default server adapter is created for the server runtime environment.
Note
Alternatively, you can download and install JBoss community application servers when adding server runtime environments within under Server→Runtime Environments, with the wizard for creating new servers, or with the Start from scratch and Start from a sample wizards in JBoss Central.
You must define a server in the IDE before you can use it. A complete server definition is composed of two elements:
A server runtime environment informs the IDE about available local application servers. Each server runtime environment defines a specific application server configuration in terms of the application server itself, a configuration file and a Java developer kit. By varying the configuration details, one application server can be associated with several server runtime environments.
A server adapter, or simply server, informs the IDE about management settings for server runtime environments. Each server adapter completes the definition for a specific server by detailing settings such as access parameters, launch arguments, and publishing options. By varying the configuration details, one server runtime environment can have several server adapters associated with it.
JBoss Server Tools provides runtime detection that automatically generates a complete default server definition for any installed application servers found in a given local system search path, as detailed in the procedure below. Complete server definitions are automatically generated for JBoss community servers downloaded with JBoss Server Tools.
Procedure 3.2. Define a Local Server with Runtime Detection
Click →, expand JBoss Tools and select JBoss Runtime Detection.
Click .
Select a path from which recursive scanning for application servers should commence. To detect a specific application server, select the install directory for that application server. To detect multiple application servers, select a directory higher up the directory tree.
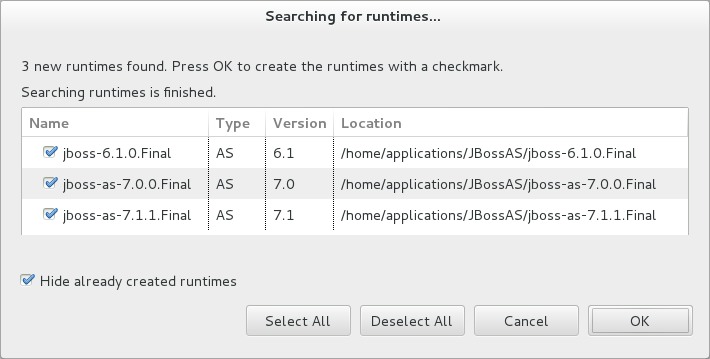
Depending on the outcome of the scan, follow the appropriate step:
If no new application servers are found or you do not wish to create any server runtime environments for them, click .
If new application servers are found, you can generate server runtime environments for them. Select the check boxes of the application servers for which you want to generate server runtime environments and click .
In all cases, the path is added to the Paths table.
Click and click to close the Preferences window.
Generated server runtime environments are listed in under Server→Runtime Environments. A default server adapter is automatically created for each generated server runtime environment to complete the server definition. Server adapters are listed in the Servers tab.

Note
Alternatively, you can manually define servers by using the IDE server functions to create a server runtime environment and then to create a server adapter.
Runtime detection defines a local server for each application server it discovers in given search paths on your system. But you may want to create additional server runtime environments with different configurations for an installed application server. The procedure below details the process for creating new server runtime environments. For older versions of application servers, you can also create a new runtime server by cloning an existing one.
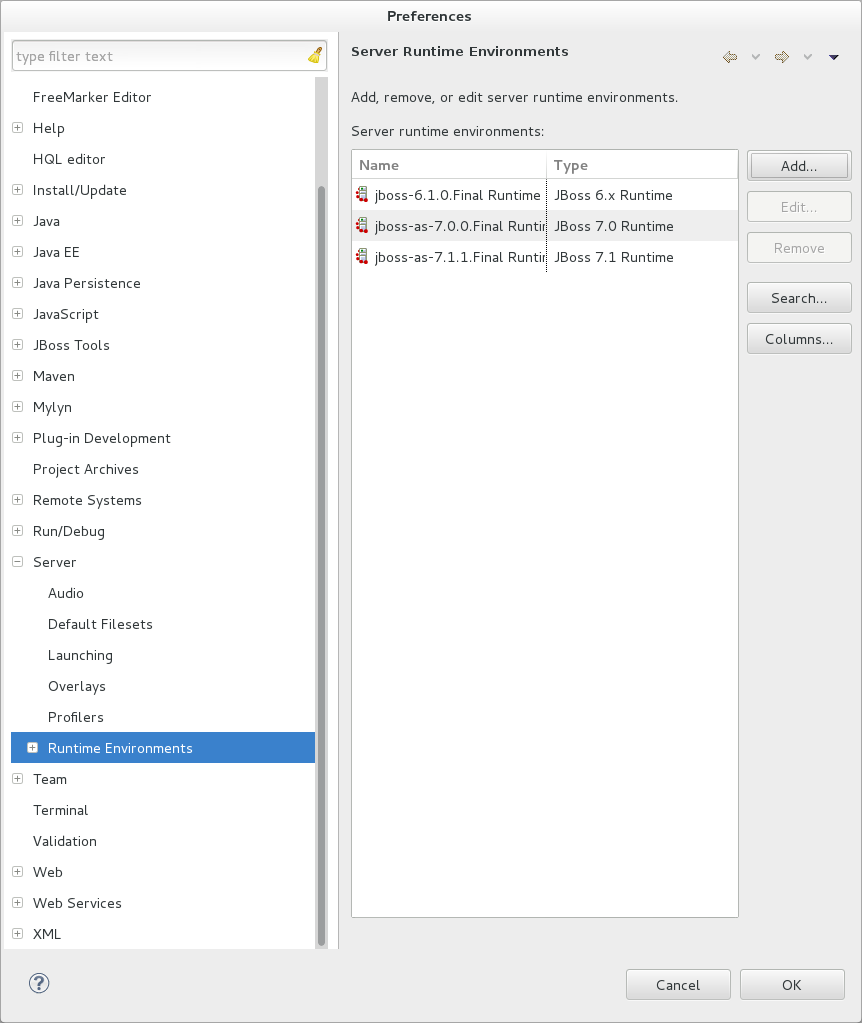
Procedure 3.3. Create a Server Runtime Environment
Click →, expand Server and select Runtime Environments.
Click .
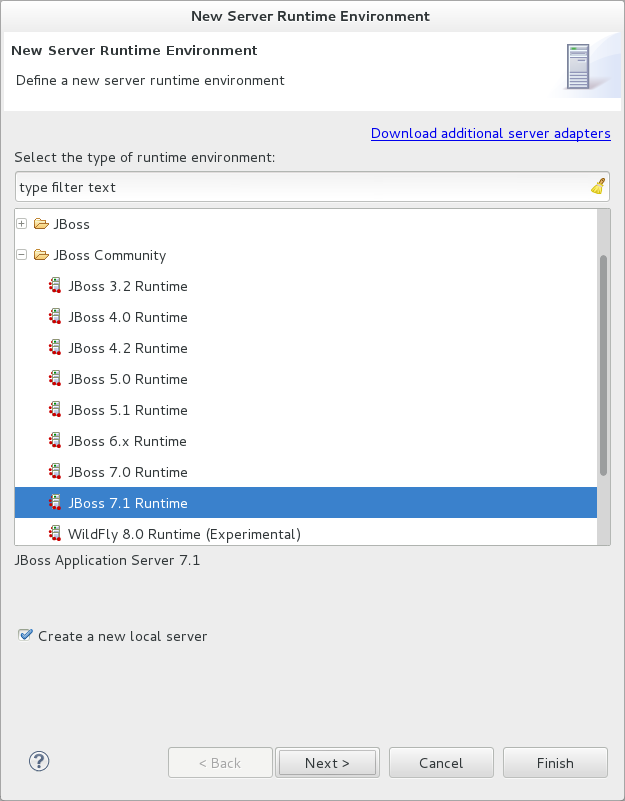
From the Select the type of runtime environment list, select a JBoss community application server.
To create a complete local server definition, select the Create a new local server check box.
Click .
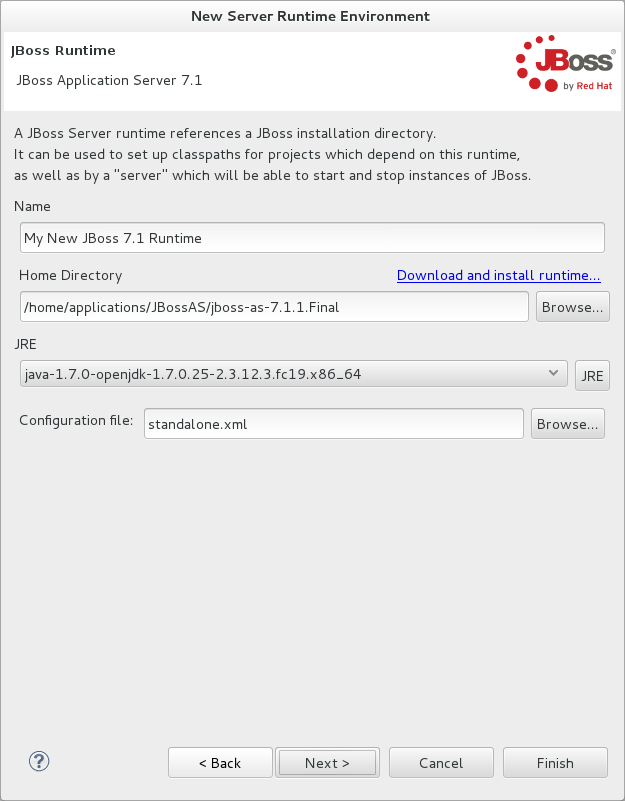
In the Name field, type a name by which to identify the server runtime environment within the IDE.
In the Home Directory field, type the path of the installed application server or click to navigate to the location.Alternatively, to use a JBoss community application server that is not already installed on the system, click Download and install runtime and follow the instructions.
From the JRE list, select the JRE to use with the application server.
In the Configuration file field, type the path of the application server configuration file or click to navigate to the location. Note that the path of the application server configuration file is relative to
Home Directory/standalone/configuration/, whereHome Directoryis specified in the Home Directory field.Note
For older application servers, the Configuration file field is replaced with the Directory field. In this field, type the path where the application server configurations are installed and then select a listed configuration. To clone from an existing server runtime environment, after selecting a listed configuration click . Complete the name for the new configuration and the location where the configuration should be stored and click .
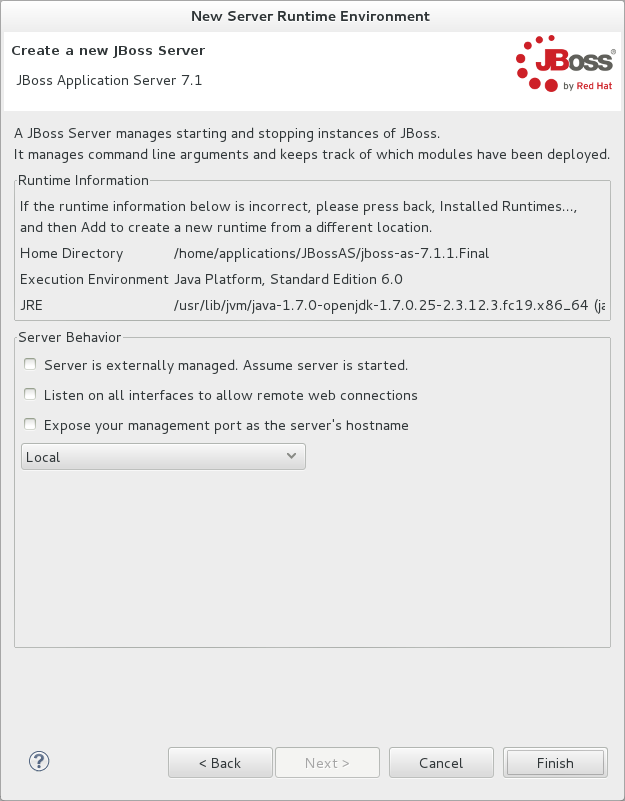
Click if the button is enabled, otherwise click . The button is only enabled if you selected the Create a new local server check box earlier. On the presented page, complete the appropriate information and click .
Note
Alternatively, you can create server runtime environments with the wizard for creating new servers in the Servers tab or with the Start from scratch and Start from a sample wizards in the JBoss Central tab.
Runtime detection defines a local server for each application server it discovers in given search paths on your system. But you may want to create additional server adapters with different configurations to define multiple servers. To create a new server adapter to define a local server, you must use the new server wizard as detailed in the procedure below.
Procedure 3.4. Define a Local Server
Click the Servers tab. If the Servers tab is not visible, click →→.
Depending on the number of existing servers, follow the appropriate step:
If there are no existing servers, click Click this link to create a new server.
If there are one or more existing servers, right-click an existing server and click →.
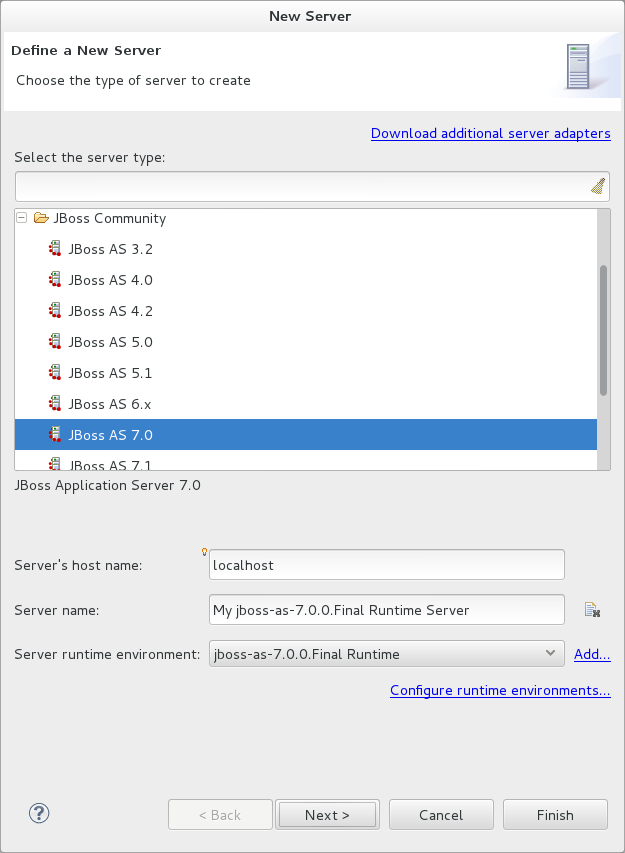
From the Select the server type list, select a JBoss community application server.
The Server's host name and Server name fields are completed by default. In the Server name field, type a name by which to identify the server definition.
From the Server runtime environment list, select the specific server runtime environment for the application server type to use. Alternatively, to create a new runtime environment click and complete the fields as appropriate.
Note
If the Server runtime environment field is not shown, no server runtime environments exist for the selected application server type. A server runtime environment must be selected before you can successfully create a server adapter and complete the server definition. To create a new server runtime environment without canceling the wizard, click and complete the fields as appropriate.
Click .
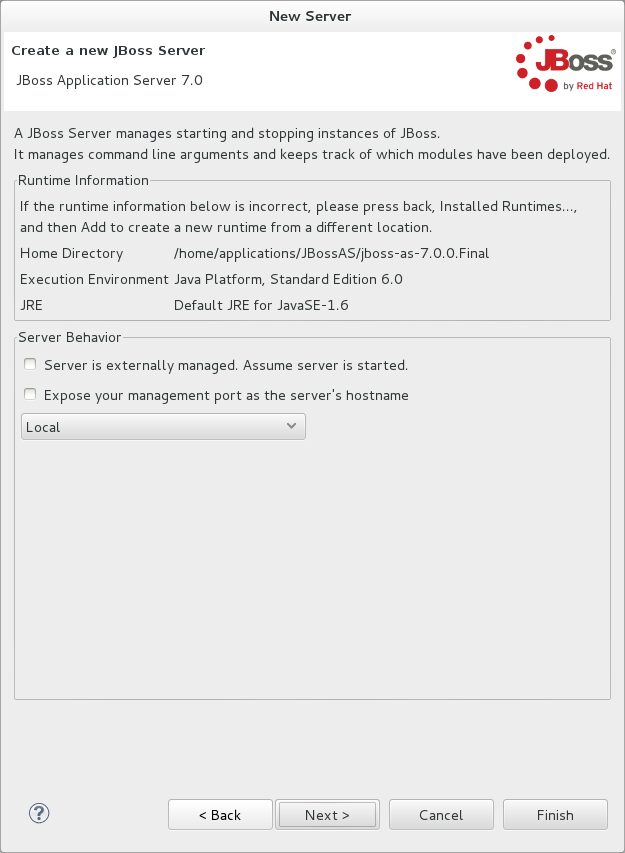
The server behavior options displayed vary depending on the selected application server type.
Complete the options as appropriate:
To specify that the server life cycle will be managed from outside the IDE, select the Server is externally managed check box.
To specify that the server should be launched to respond to requests on all hostnames, select the Listen on all interfaces to allow remote web connections check box. This option adds the
-b 0.0.0.0argument to the server launch command.To enable management commands sent by the IDE to be successfully received by the server, select the Expose your management port as the server's hostname check box. This option is useful for remote servers but bypassed for local servers.
Note
To make use of this facility, a management user must exist for the remote server and you must provide the management user credentials to the IDE.
From the location list, select Local.
Click .
To select applications to deploy with this server, from the Available list select the applications and click . Applications to be deployed are detailed in the Configured list.
Click to create the server. The server is listed in the Servers tab, with the information in brackets detailing the server status.

Important
You can create multiple servers that use the same application server. But a warning is displayed if you try to simultaneously run more than one server on the same host. This is because multiple running servers on the same host can result in port conflicts.
You can define remote servers for JBoss community application servers. To complete a server definition, you must create a server adapter, or server, that informs the IDE how to communicate and manage the remote server, as detailed in the procedure below.
Important
A complete server definition requires a server runtime environment and a server adapter. Ideally the server runtime environment would be created by specifying the remote application server and remote Java developer kit but server runtime environments can only be created using local components. To work around this issue, you must have a version of the remote application server and remote Java developer kit installed locally and create a server runtime environment based on these.
Procedure 3.5. Define a Remote Server
Click the Servers tab. If the Servers tab is not visible, click →→.
Depending on the number of existing servers, follow the appropriate step:
If there are no existing servers, click Click this link to create a new server.
If there are one or more existing servers, right-click an existing server and click →.
From the Select the server type list, select a JBoss community application server.
The Server's host name and Server name fields are completed by default. In the Server name field, type a name by which to identify the server definition.
From the Server runtime environment list, select the specific server runtime environment for the application server type to use. Alternatively, to create a new runtime environment click and complete the fields as appropriate.
Note
If the Server runtime environment field is not shown, no server runtime environments exist for the selected application server type. A server runtime environment must be selected before you can successfully create a server adapter and complete the server definition. To create a new server runtime environment without canceling the wizard, click and complete the fields as appropriate.
Click .
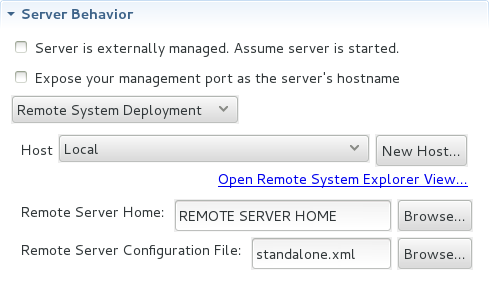
The server behavior options displayed vary depending on the selected application server type. Complete the options as appropriate:
To specify that the server life cycle will be managed from outside the IDE, select the Server is externally managed check box.
To specify that the server should be launched to respond to requests on all hostnames, select the Listen on all interfaces to allow remote web connections check box. This option adds the
-b 0.0.0.0argument to the server launch command.To enable management commands sent by the IDE to be successfully received by the server, select the Expose your management port as the server's hostname check box. This option is useful for remote servers.
Note
To make use of this facility, a management user must exist for the remote server and you must provide the management user credentials to the IDE.
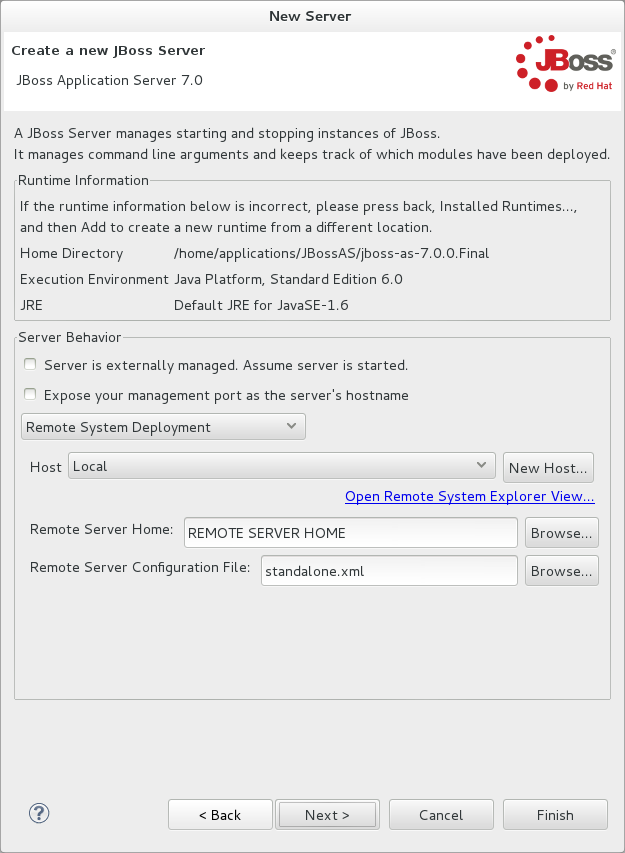
From the location list, select Remote System Deployment.
From the Host list, select the host. Alternatively, to specify a new host, click and follow the instructions.
In the Remote Server Home field, type the path of the application server or click to navigate to the location.
In the Remote Server Configuration File field, type the path of the configuration file or click to navigate to the location.
Click .
To select applications to deploy with this server, from the Available list select the applications and click . Applications to be deployed are detailed in the Configured list.
Click to create the server. The server is listed in the Servers tab, with the information in brackets detailing the server status.
JBoss Server Tools provides the JBoss Server Editor for managing the settings of servers. This editor has two modes: Overview and Deployment. As described below, each mode enables you to configure fundamental server settings.
The Overview mode details the settings for the server. Within this mode you can provide management information, specify application publishing and reload behavior, and customize port settings.
The Deployment mode lists applications deployed to the server. Within this mode you can specify the general publishing behavior for applications and provide deployment settings for individual applications.
To open the JBoss Server Editor for a specific server, in the Servers tab double-click the server. All changes to the settings of a server must be saved before the results will take effect. To save, press Ctrl+S. You may be required to enter the server management password when making changes to certain settings.
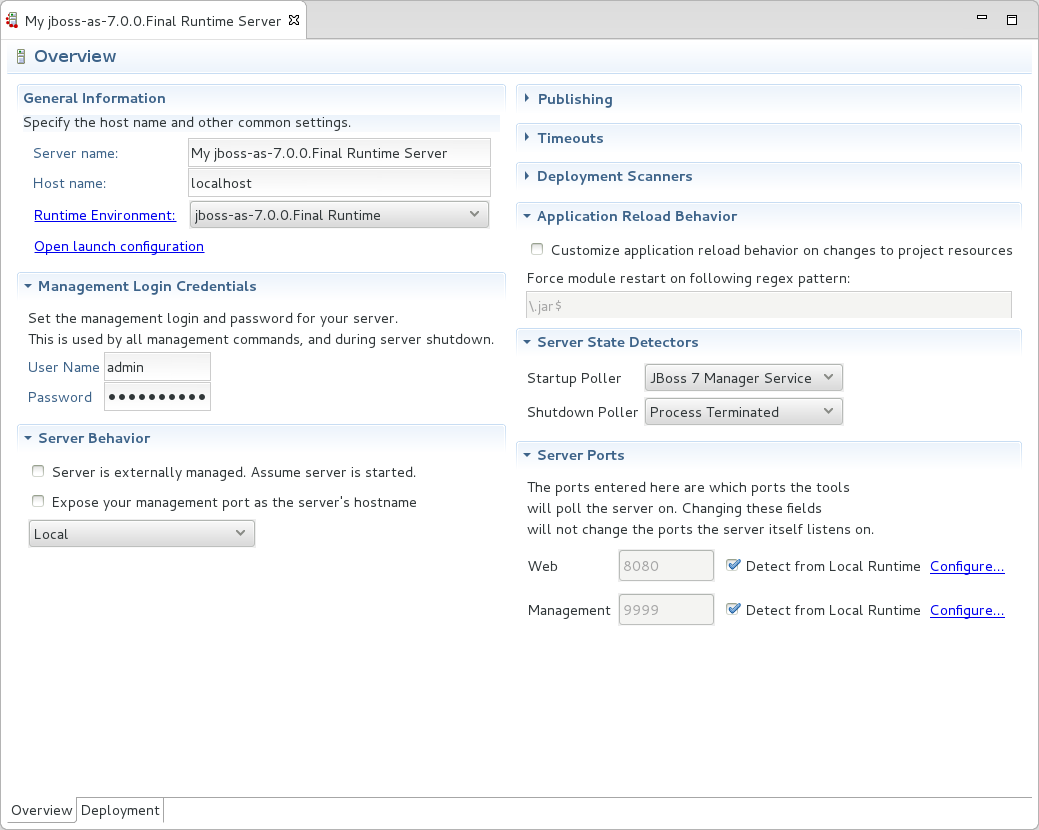
The Overview mode of the JBoss Server Editor enables you to vary the management and behavior settings of an individual server. Each section of the Overview mode is outlined below. All changes to server settings must be saved before the results will take effect. To save, press Ctrl+S.
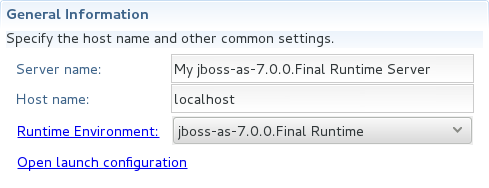
- General information
This section details essential information comprising the server definition: the name by which the server is identified in the IDE, the hostname of the server and the server runtime environment.
To change the server runtime environment, from the Runtime Environment list select a server runtime environment. Alternatively, to create and assign a new server runtime environment click Runtime Environment and follow the instructions.
To view or edit the server launch configuration, click .
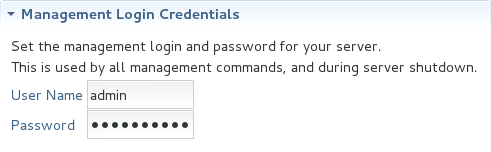
- Management login credentials
This section holds credentials, specifically username and password, necessary for the IDE to successfully communicate management commands with the server. The password is obscured and stored in Eclipse Secure Storage for security. Incorrect management credentials can cause the IDE to not detect when a server is started.
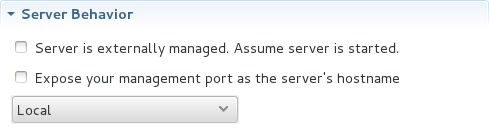
- Server behavior
This section enables you to customize server behavior that encompasses how the IDE communicates with the server.
To specify that the server life cycle will be managed from outside the IDE, select the Server is externally managed check box.
To specify that the server should be launched to respond to requests on all hostnames, select the Listen on all interfaces to allow remote web connections check box. This option is most useful for remote servers and adds the
-b 0.0.0.0argument to the server launch command.To enable management commands sent by the IDE to be successfully received by the server, select the Expose your management port as the server's hostname check box. This option is useful for remote servers and unnecessary for local servers.
Warning
The Expose your management port as the server's hostname feature should be used carefully for servers on production as it leaves the server open for anyone to access.
To specify the location of the server, from the list select Local or Remote System Deployment. For remote systems, there are further details that must be specified: the host, the path of the remote application server, and the remote application server configuration file.
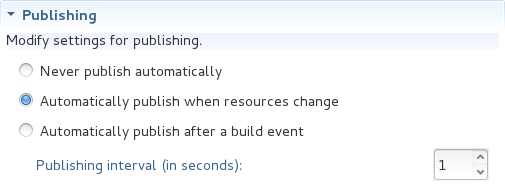
- Publishing
This section details the publishing action the IDE should take in response to modifications to local resources of deployed applications. Publishing involves replacing changed project resources in the dedicated deployment location of a server and the IDE action options are Never publish automatically, Automatically publish when resources change, and Automatically publish after a build event. Additionally, you can specify a minimum time interval that must occur between consecutive automated publish actions by the IDE to control the frequency of publishing.
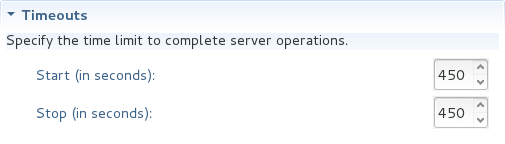
- Timeouts
This section specifies the maximum length of time, in seconds, the IDE should wait for server actions to complete before aborting. The server actions are specifically starting and stopping.
- Deployment scanner
This section enables you to customize the behavior of deployment scanners, which detect the applications deployed to a server. You can manage deployment scanners or allow the IDE to do it for you. The management options available are Add missing deployment scanners after server startup and Remove added deployment scanners before shutdown.
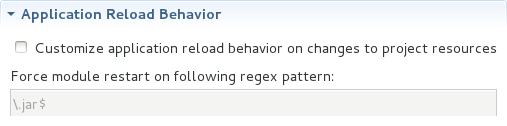
- Application reload behavior
This section details the application reload action the IDE should take in response to changed published resources of deployed applications. Application reload involves undeploying and redeploying an application and this action is necessary when you make changes to project resources that will not be detected by the server. By default, the application reload behavior is set to invoke application redeployment when
.jarfiles are changed.To customize which changes invoke application redeployment, select the Customize application reload behavior on changes to project resources check box. In the Force module restart on following regex pattern field, type a regex pattern indicating the changed resources that you want to trigger redeployment.
To disable application reload, select the Customize application reload behavior on changes to project resources check box and ensure the Force module restart on following regex pattern field is empty.
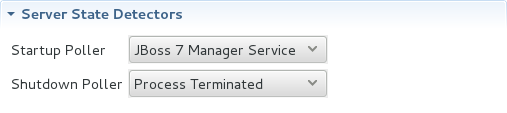
- Server state detectors
This section specifies which method the IDE should use to verify the started and stopped status of the server.
There are four methods from which to choose:
Web Port, which pings the web port on the host to see if the server responds
Timeout, which waits for a specified time duration and then declares the start or stop operation a success without any actual verification
Process Terminated (available for Shutdown Poller of local servers only), which checks if a server process is still alive and sets the server status to stopped when it is terminated
JMX, which polls JMX, the JBoss Management service
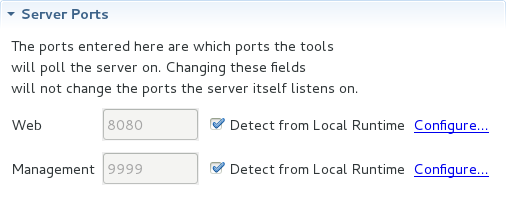
- Server ports
This section details the ports and port offset that the IDE should use for communication with the server.
Port offset is typically offered by newer application servers and it enables multiple servers to run on the same system without port conflicts. JBoss Server Tools uses information in the server configuration file, typically XPath values, to automatically detect the correct ports and port offset for communicating with the server but you can perform further customization.
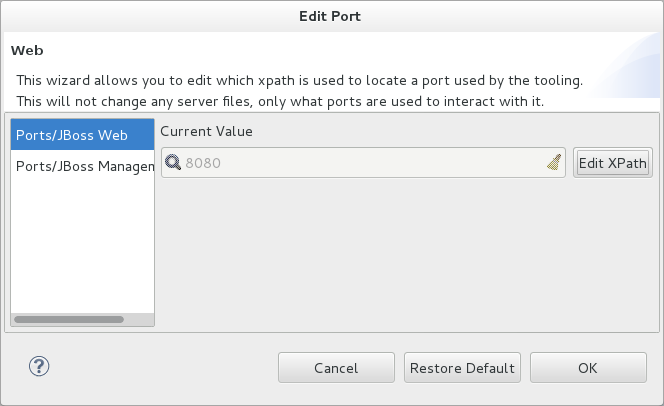
To view the configuration file information used by JBoss Server Tools for automatic port detection, click corresponding to the appropriate tool. The information used is displayed in the Current Value field. To change this value, click . Click to close the window.
To manually specify the server ports or port offset, clear the Detect from Local Runtime check box corresponding to the appropriate tool and edit the value.

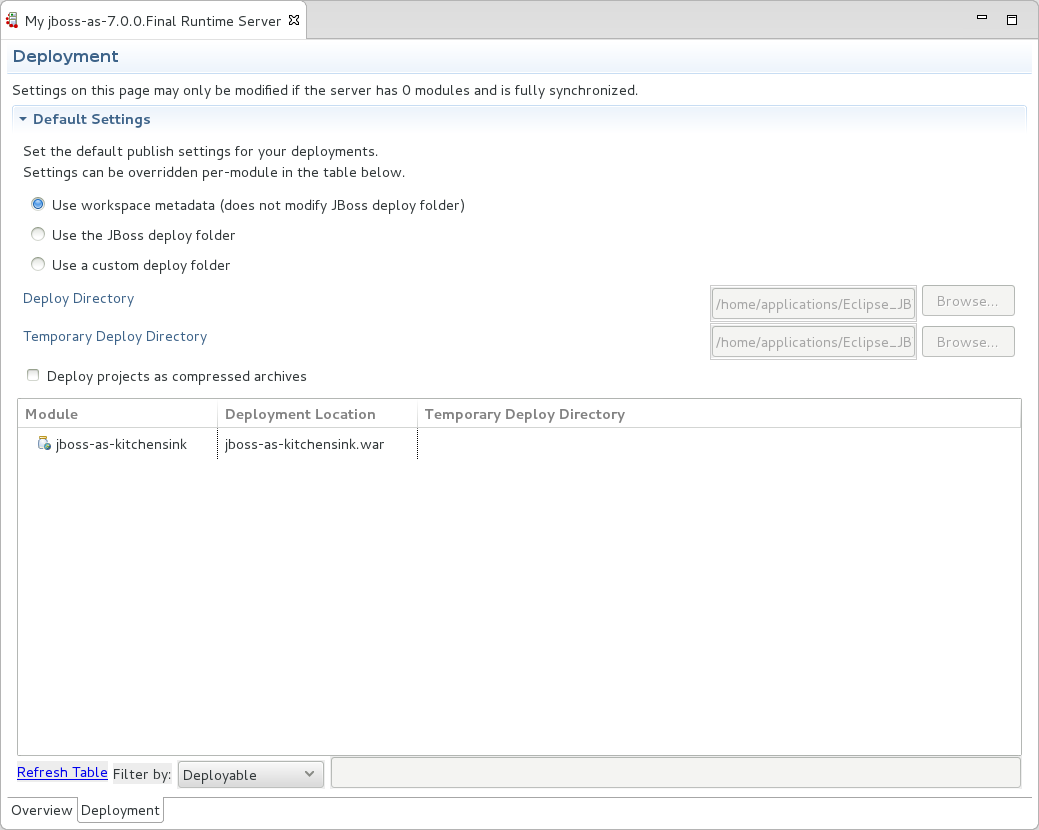
The Deployment mode of the JBoss Server Editor enables you to vary the deployment settings of an individual server. Each section of the Deployment mode is outlined below. All changes to server settings must be saved before the results will take effect. To save, press Ctrl+S.
Important
Changing deployment settings when modules are already deployed can adversely result in multiple deployed copies of an application. For this reason, many of the functions of the Deployment mode are only enabled when a server is fully synchronized and it has no modules deployed.
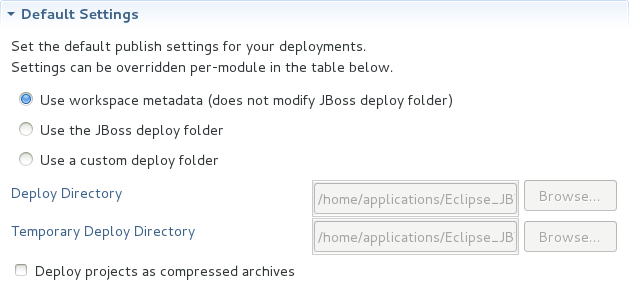
- Default settings for the server
This section specifies where deployments are kept and how they are packaged.
You can customize the deployment location and packaging type:
To select the workspace deployment folder for the server, click Use workspace metadata.
To select the deployment folder of the application server, click Use the JBoss deploy folder.
To select a folder of your choice, click Use a custom deploy folder. With this option, you should complete the Deploy directories and Temporary Deploy Directory fields. The temporary folder must be on the same file system as the final deploy location otherwise publishing often fails.
For all modules to be archived for deployment, select the Deploy projects as compressed archives check box. This avoids exploded deployments and reduces the amount of memory deployments occupy but may result in slower deployments.
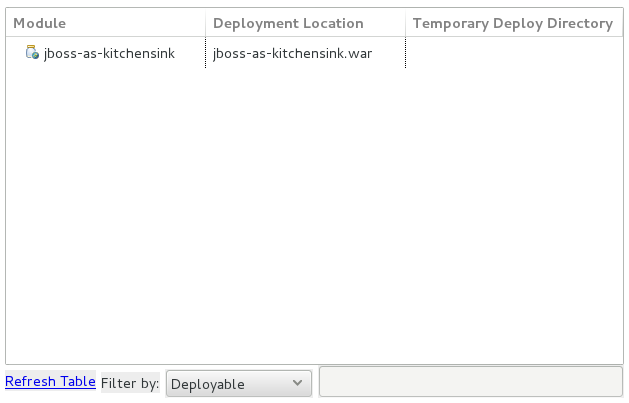
- Settings per module
This section shows deployment settings for all modules in the workspace regardless of whether they are deployed on the server under consideration.
To filter the module list in the case that you have lots of modules, from the Filter by list select the criteria for the filter. If you select By Module Name, in the text field enter the part or whole name of the module.
To change the Deployment Location and Temporary Deploy Directory on a per module basis, in the table click the value to be changed and enter an alternative value. Ensure the values for these variables are specified use absolute paths or paths relative to the default deploy directory.
The aim of this section is to guide you in customizing JBoss Server Tools:
Enable runtime detection to search paths for application servers on IDE start
Select a default server for IDE actions
Specify default filesets that are listed in the Servers tab for ease of access
Customize classpath entries for your projects based on application server type
You can customize runtime detection to automatically search paths for installed application servers when the IDE starts. If any application servers are found, you are prompted about creating corresponding complete server definitions.
To enable automated searching on IDE start, click →. Expand JBoss Tools and select JBoss Runtime Detection. In the Paths table, select the Every start check box for all of the paths that you want to be automatically searched on IDE start. Click and click to close the window.
JBoss Server Tools enables you to select a default server on which to carry out actions such as . This is useful when you have multiple server instances but use one predominately.
To set a default server, in the global toolbar of the JBoss perspective click the icon
 . From the list of servers, click the server that you want to set as the default.

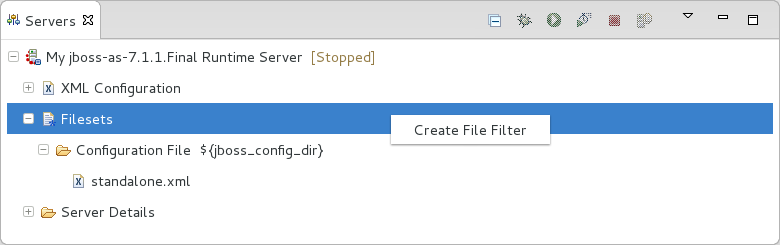
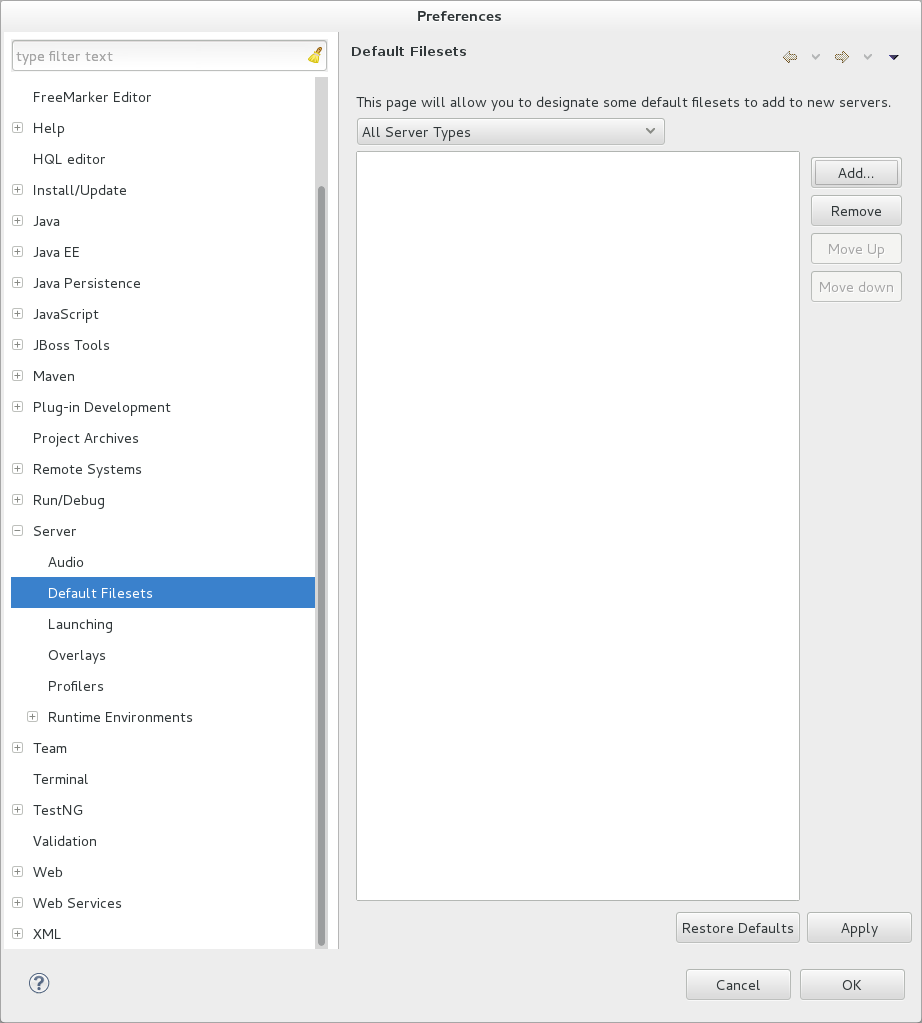
Filesets are collections of files that are listed under the server in the Servers tab for ease of access. You can open listed files for viewing and modifying in IDE editors by double-clicking them. JBoss Server Tools generates a default fileset for new JBoss community application servers that includes the server configuration file. But JBoss Server Tools also provides the ability for you to customize default filesets for individual servers and an application server type.
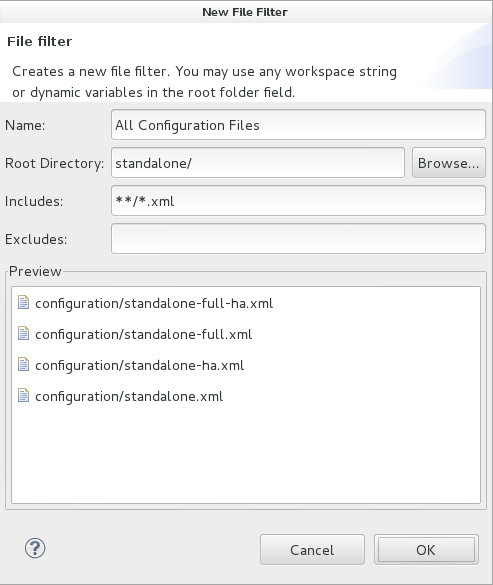
To customize the fileset for an individual server, in the Servers tab expand the server. Right-click Filesets and click . In the Name field, type a name for the filter. In the Root Directory field, type the path of the directory in which the filter should be applied or click to navigate to the location. In the Includes and Excludes fields, type the regex patterns for filtering. Click to create the filter. The new filter is listed under the server in the Servers tab and expanding it shows all of the files matching the filter.
To customize the default fileset for an application server type, click →. Expand Server and select Default Filesets. From the list, select a JBoss community application server type. Click or click to customize the default filesets. Click and click to close the window.
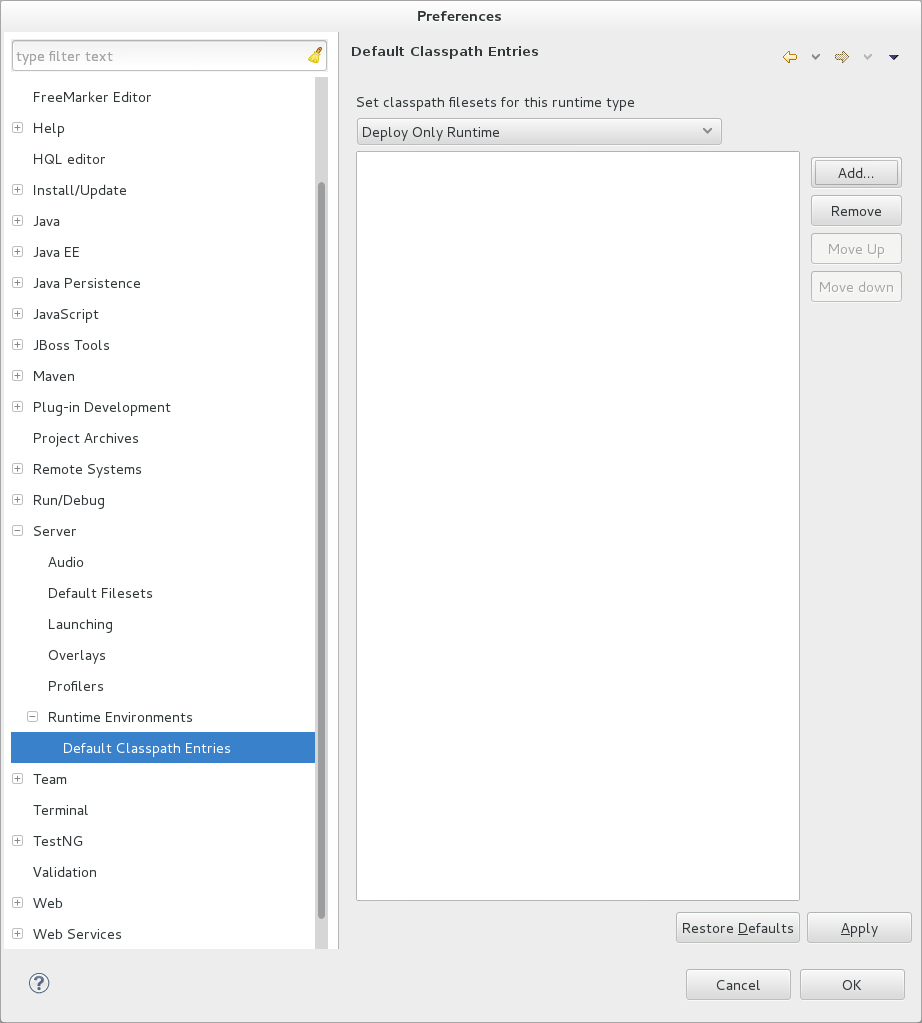
Classpath entries specify the availability of .jar files for your projects. JBoss Server Tools generates a default classpath fileset for new JBoss community application servers based on the .jar files that accompanying each. But JBoss Server Tools also provides the ability for you to customize classpaths for individual servers and an application server type.
To customize the classpath fileset for an application server type, click →. Expand Server→Runtime Environments and select Default Classpath Entries. From the Select classpath filesets for this runtime type list, select a JBoss community application server type. Click or click to customize the classpath filesets. Click and click to close the window.