In this chapter of the guide you will find information on the tasks that you can perform integrating BIRT. The required version of BIRT is 2.3.2 or greater.
This section discusses the process of integrating BIRT into a Seam web project.
To follow this guide you will need to have the Seam runtime and JBoss Application Server downloaded and extracted on your hard drive. You can download Seam from the Seam Framework web page and JBoss Application Server from JBoss Application Server official site.
Tip:
JBoss Seam 2.2.1 GA and JBoss Application Server 5.1.0 GA were used in the examples presented in this guide.
It is recommended that you open the Seam Perspective by selecting → → → . This perspective provides convenient access to all the Seam tools.
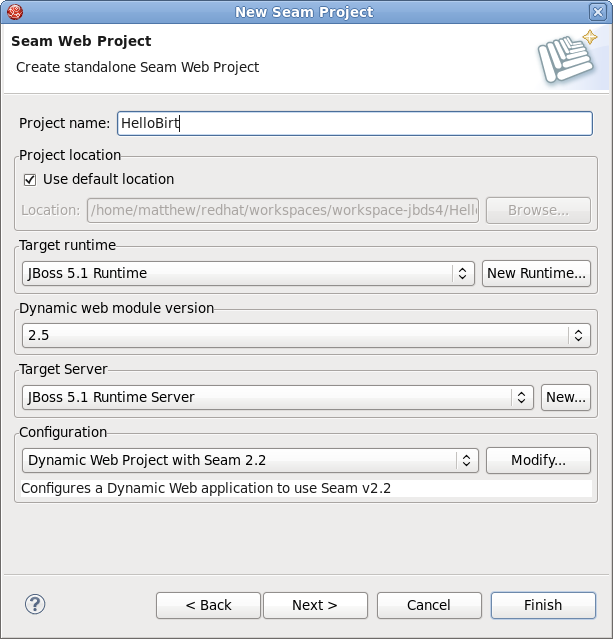
To create a new Seam Web project select → → . If the Seam Perspective is not active, select → → → → .
On the first wizard page enter the Project name, specify the Target runtime and Target server. We recommend to use the JBoss AS server and runtime environment to ensure best performance.
In the Configuration group select the Seam framework version you are planning to use in your application. In this guide we used Seam 2.2.
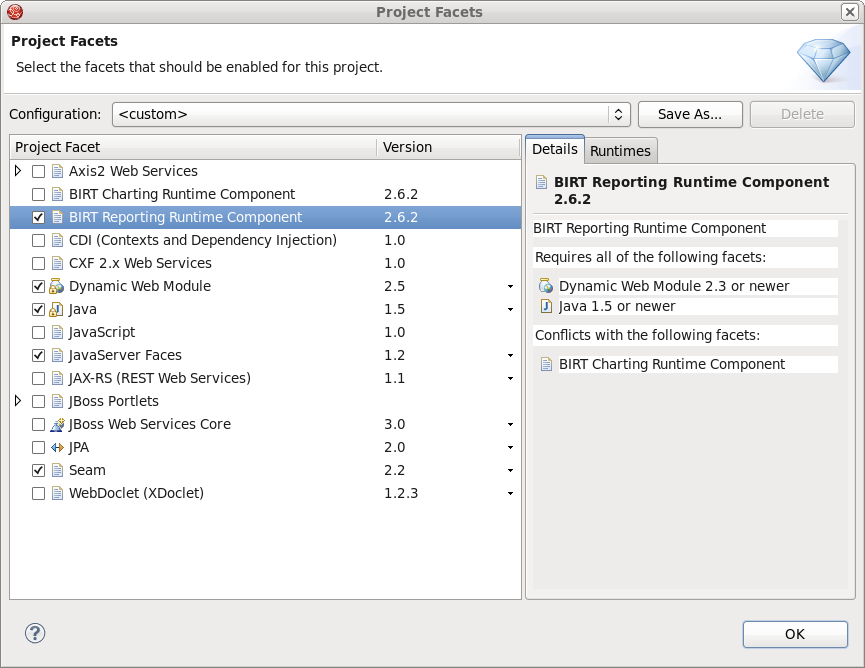
Click the button and enable the Birt Reporting Runtime Component facet by checking the appropriate option.
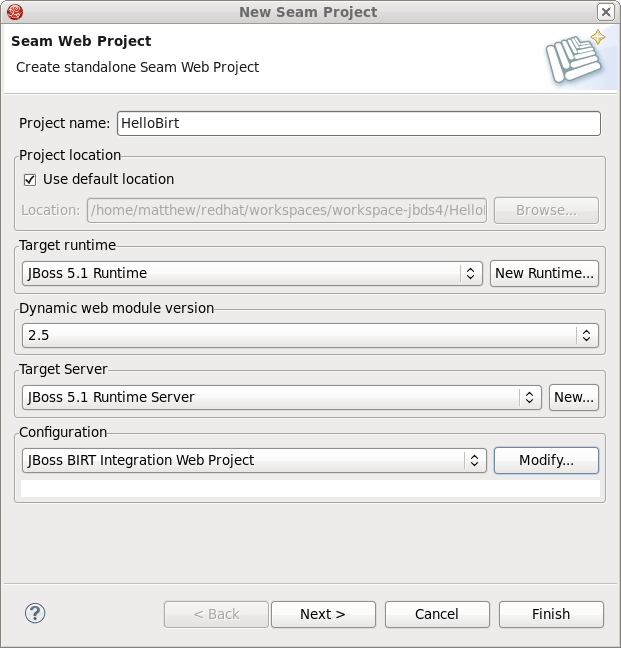
Alternatively you can select the JBoss BIRT Integration Web Project configuration option from the drop-down list in the Configuration group.
You may leave the next two pages with default values; just click the button to proceed.
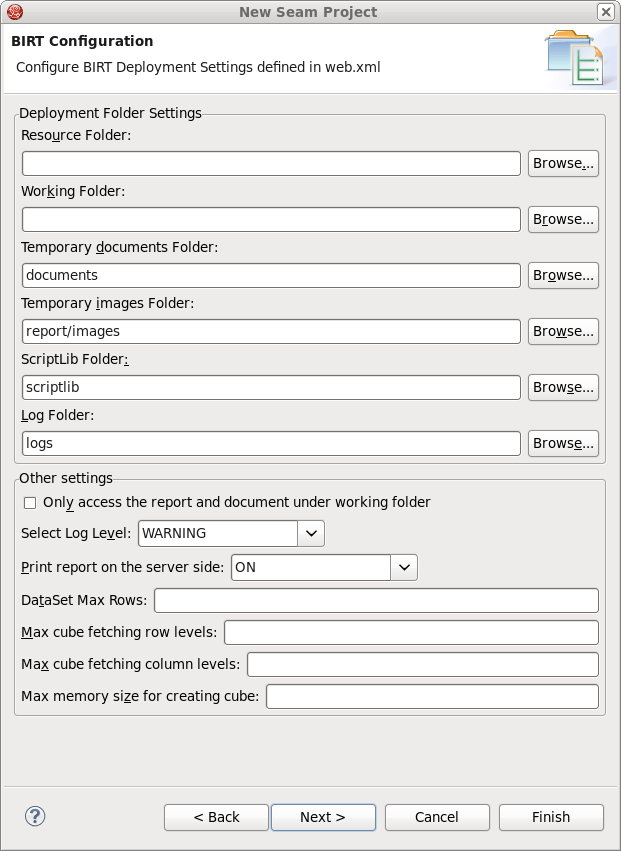
On the Birt Configuration page you can modify the BIRT deployment settings. These settings can also be edited afterwards in the
web.xmlfile included in the generated project. Keep the default values for now.You can also leave the default options on the JSF Capabilities page.
On the Seam Facet page you should specify the Seam runtime and Connection profile. Please note that the Seam runtime must be the same version you initially specified in the project settings (See Figure 3.1, “Creating Seam Web Project”).
When creating a Seam project with BIRT capabilities you can use the BIRT Classic Models Sample Database connection profile to work with the BIRT sample database.
For more details on how to configure database connection for a Seam project please read the Configure Seam Facet Settings chapter of Seam Dev Tools Reference Guide.
Click the button to create the project with BIRT functionality enabled.

In the previous section you have created a Seam project with BIRT capabilities. Now you can create a simple kick start project to see that everything is configured correctly.
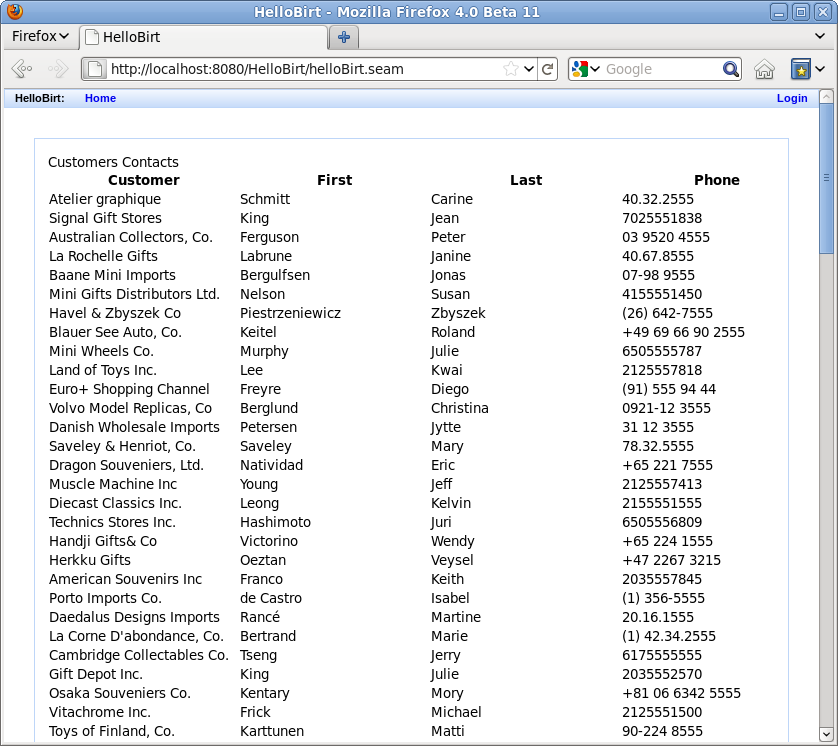
Now create a BIRT report file and insert test data into the file. Name the report file
helloBirt.rptdesignin theWebContentfolder.The report should print the data from the
CLASSICMODELS.CUSTOMERStable of the BIRT Classic Models Sample Database, namely:Customer number (
CLASSICMODELS.CUSTOMERS.CUSTOMERNAME)Contact person first name (
CLASSICMODELS.CUSTOMERS.CONTACTFIRSTNAME)Contact person last name (
CLASSICMODELS.CUSTOMERS.CONTACTLASTNAME)Contact person phone number (
CLASSICMODELS.CUSTOMERS.PHONE)
The title of the report should be set via
reportTitleparameter.As this guide is primarily focused on the BIRT integration and not the BIRT technology itself, the steps required to make the report will not be shown. For more information on creating a BIRT report file please read the BIRT documentation.
Tip
You can download the
helloBirt.rptdesignfile here and copy it to theWebContentfolder of your Seam project.When you are done with the
helloBirt.rptdesignfile, you should create a.xhtmlfile that will contain the BIRT report you have just created.The JBoss BIRT Integration framework provides 2 components represented as <b:birt> and <b:param> tags. The jboss-seam-birt.jar library implements the functionality of the components. To find more information about the framework pleas read the JBoss BIRT Integraion Framework API Reference chapter. To use that tags on the page you need to declare the tag library and define the name space like this:
xmlns:b="http://jboss.com/products/seam/birt"The <b:birt> is a container for a BIRT report, that helps you integrate the report into Seam environment. You can manage the properties of the report using the attributes of the <b:birt> tag.
The <b:param> tag describes report parameters. To set a parameter you need to specify it's name the value you want to pass. You can use EL expressions to bind the representation layer with back-end logic.
Create the
helloBirt.xhtmlfile in theWebContentfolder with the following content:<!DOCTYPE composition PUBLIC "-//W3C//DTD XHTML 1.0 Transitional//EN" "http://www.w3.org/TR/xhtml1/DTD/xhtml1-transitional.dtd"> <ui:composition xmlns="http://www.w3.org/1999/xhtml" xmlns:s="http://jboss.com/products/seam/taglib" xmlns:ui="http://java.sun.com/jsf/facelets" xmlns:rich="http://richfaces.org/rich" xmlns:b="http://jboss.com/products/seam/birt" template="layout/template.xhtml"> <ui:define name="body"> <rich:panel> <b:birt designType="embed" designName="helloBirt.rptdesign" embeddable="true"> <b:param name="reportTitle" value="Customers Contacts" /> </b:birt> </rich:panel> </ui:define> </ui:composition>
From this listing above you see that the title of the report is set via
<b:param>by setting the parameter name and defining thevalueattribute with theCustomers Contactsvalue.We have created a Seam project and inserted the
helloBirtreport into thehelloBirt.xhtmlview file.To see that the application works correctly and as you expect, you need to launch it on the server.
In the Servers view (if it is not open select → → → → ), select the server the application is deployed to and hit the button.
When the server is started, open your favorite browser and point it to http://localhost:8080/HelloBirt/helloBirt.seam.
The JBoss BIRT Integration feature includes the Hibernate ODA Data Source which is completely integrated with Hibernate Tools. You can use it the way as you would use any of BIRT ODA drivers.
First, you need to reverse engineer from the database to generate Seam entities. You can perform this operation going to → → in the Seam perspective. More details on the Seam Generate Entities please read Seam Developers Tools Reference guide). In this guide we will use the Employees table of the DATAMODELS database, which can be downloaded from the Getting Started Guide.
Tip:
Before performing Seam Generate Entities, you should have a connection profile adjusted and connected to a database. For information on how to do this see the CRUD Database Application chapter of the Seam Developer Tools Reference guide.
Next you should create a new BIRT report file ( → → → → ) to represent the data from the Employees table. Call the file
employees.rptdesign, and save it in theWebContentfolder.Now switch to the BIRT Report Design perspective.
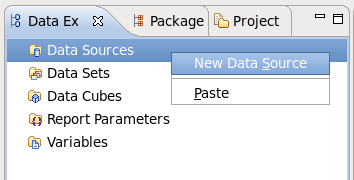
In the Data Explorer view right-click the Data Source node and choose .
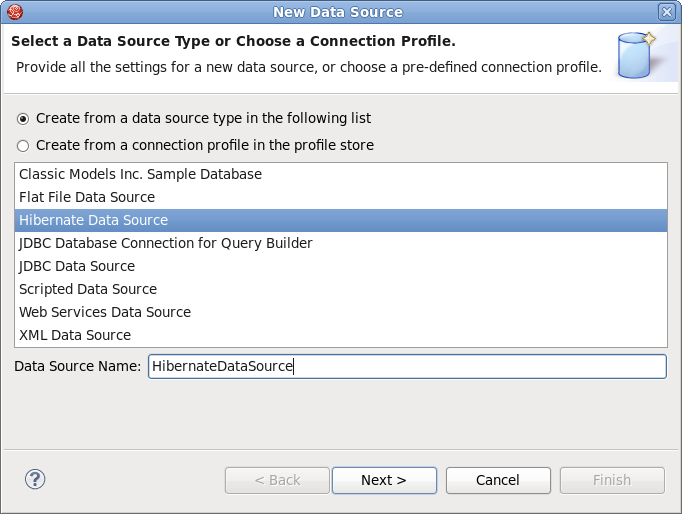
The wizard will prompt you to select data source type. Choose Hibernate Data Source and give it a meaningful name, for instance HibernateDataSource. Click the button to proceed.
On the next wizard's dialog you can leave the everything with default values, click the button to verify that the connection is established successfully.
The Hibernate Data Source enables you to specify a Hibernate Configuration or JNDI URL.
Click the button to complete New Data Source wizard.
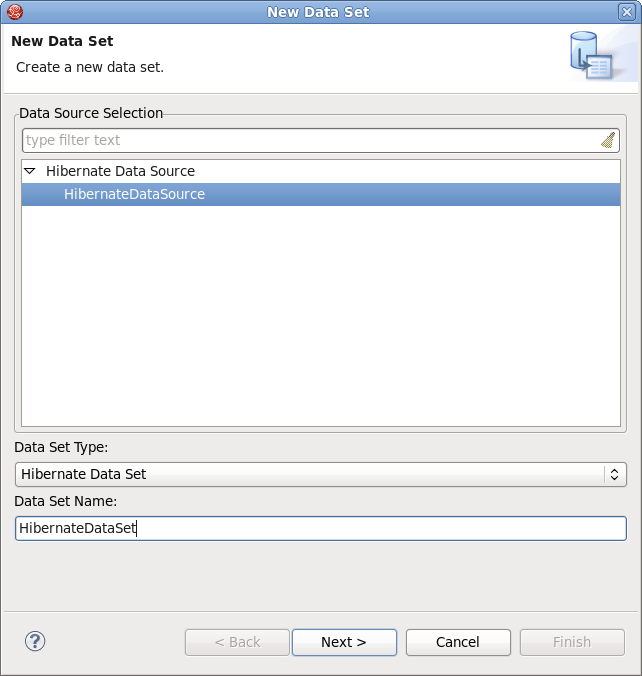
Now you need to configure a new Hibernate ODA data set. Launch the New Data Set wizard. In the Data Explorer View right-click the Data Set node and select .
Select HibernateDataSource as target data source and type in the new data set name. Call it HibernateDataSet.
The next dialog of the wizard will help you compose a query for the new data set.
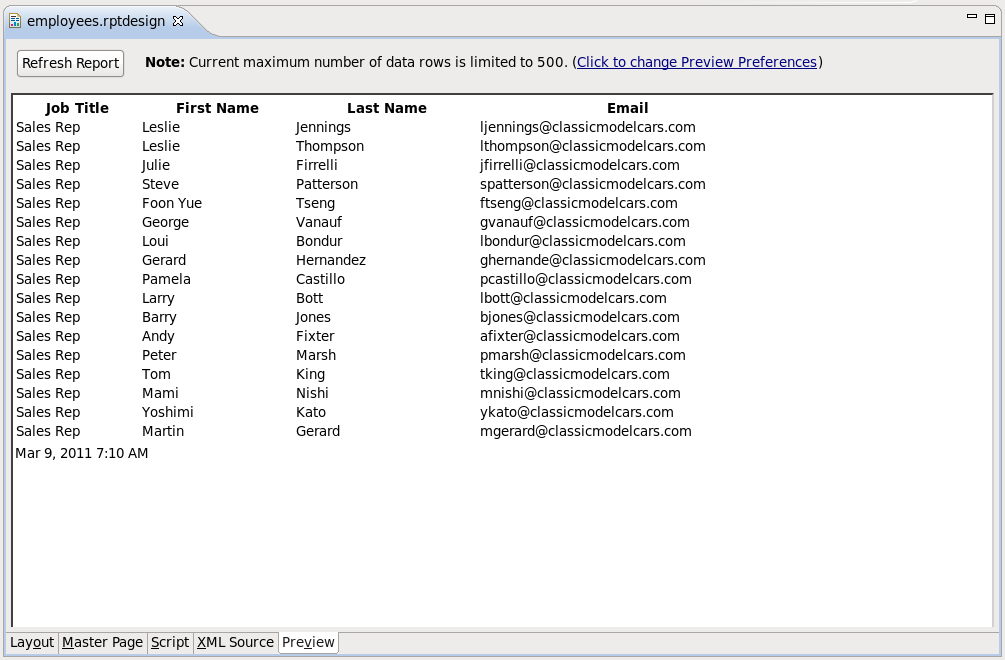
We will make a report that will print all employees in the database who has Sales Rep job title.
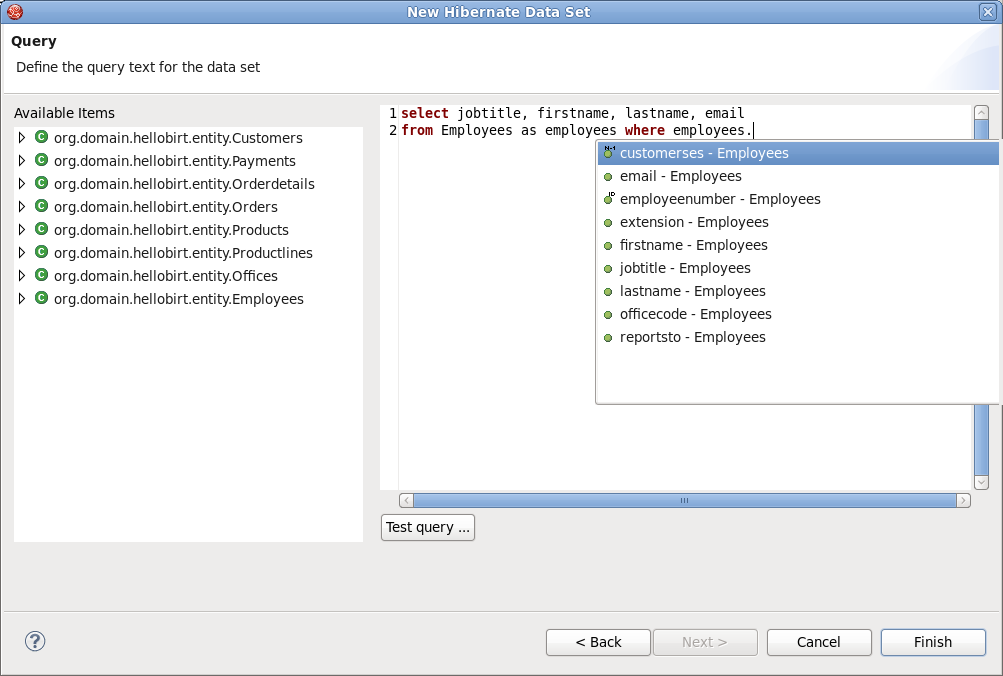
select jobtitle, firstname, lastname, email
from Employees as employees where employees.jobtitle = 'Sales Rep'
To validate the entered query you can press the button. All the HQL features like syntax highlighting, content assist, formatting, drag-and-drop, etc., are available to facilitate query composing.
Clicking the button will call the Edit Data Set dialog where you can adjust the parameters of the data set and preview the resulted set. If everything looks good, click the button to generate a new data set.
Now you can insert the data set items of HibernateDataSet into the
employees.rptdesignfile.Tip:
If you don't know how to do this we suggest that you refer to the Eclipse BIRT Tutorial.
You can also use parameters in the query to add dynamics to your report. In the previous example we hard coded the selection criterion in the
whereclause.To specify the job title on-the-fly your query should look like this:
select jobtitle,firstname, lastname,email
from Employees as employees where employees.jobtitle = ?
The question mark represents a data set input parameter, which is not the same as a report parameter. Now you need to define an new report parameter to pass the data to the report, call it
JobTitle. The dataset parameter can be linked to a report parameter. In the Data Explorer view click the Data Set node to open it and right-click on the data set you created previously (in our case it is HibernateDataSet), choose Edit and navigate to the Parameters section. Declare a new data set parameter, name itjobtitleand map it to the already existingJobTitlereport parameter.You report is ready, you can view it by clicking on the Preview tab of the BIRT Report Designer editor.
You will be prompted to assign a value to the report parameter. For instance you can enter "Sales Rep".

Section 3.1, “Adding BIRT Functionality to Standard Seam Web Project” and Section 3.2, “Using Hibernate ODA Data Source” describe how to integrate a BIRT report into a Seam web project and how to use a Hibernate data source to generate a dynamic report. In this section we will create a Seam web project that can make a dynamic report using the parameters that are defined on a web page.
We will use the PRODUCTS table of Classic Models Inc. Sample Database for the purpose of this demo project. The demo application will generate a report about the company's products, and allow the user to specify how the report will be sorted. To begin with, we need to generate Seam entities like we did in the previous Section 3.1, “Adding BIRT Functionality to Standard Seam Web Project”.
The next step is to create a Java class that will store the
sortOrdervariable and its assessors. The variable will be required to pass dynamic data to the report via report parameters; therefore it has to be of session scope.The code below shows a simple JavaBean class called
ReportJB.import java.io.Serializable; import org.jboss.seam.ScopeType; import org.jboss.seam.annotations.Name; import org.jboss.seam.annotations.Scope; @Name("ReportJB") @Scope(ScopeType.SESSION) public class ReportJB implements Serializable { private static final long serialVersionUID = 1L; protected String sortOrder = "buyprice"; public String getSortOrder() { return sortOrder; } public void setSortOrder(String value) { sortOrder = value; } public ReportJB() { } }The report will print the data from the Products table. Create a new report file file called
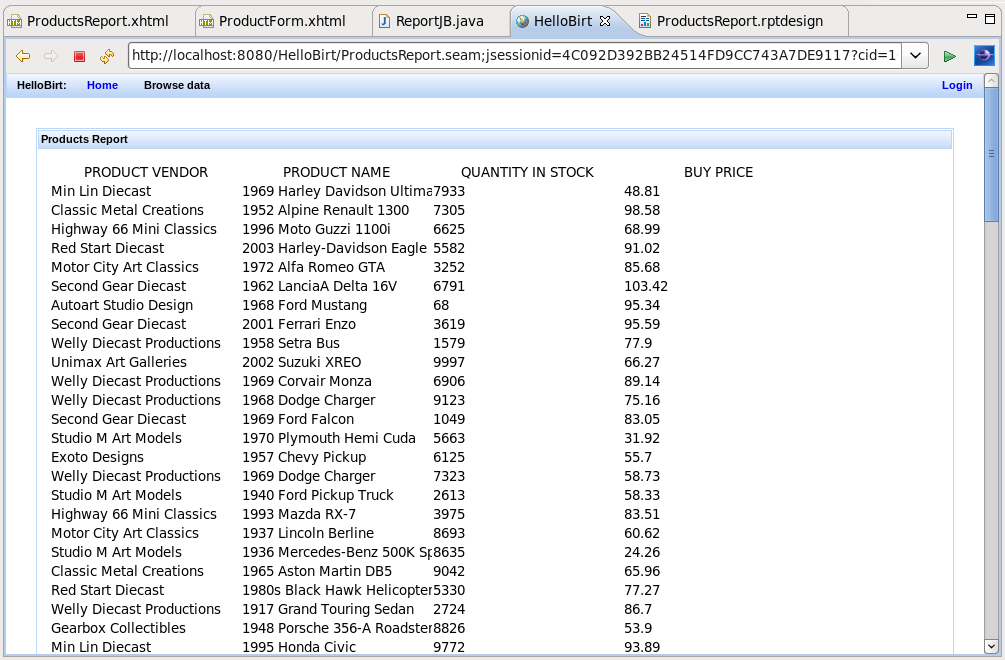
ProductsReport.rptdesignin theWebContentfolder. You can use either the BIRT JDBC Data Source or Hibernate Data Source data source to create the data set for this project. If you want to use the latter please read the previous Section 3.2, “Using Hibernate ODA Data Source”.The data set should have at least the following data set items: product vendor, product name, quantity in stock and buy price. The data is retrieved from the database with this query :
SELECT productvendor, productname, quantityinstock, buyprice
FROM CLASSICMODELS.PRODUCTS as products
Make a table in the report and put each data set item into a column.
As it was stated in the beginning of the chapter the report will be dynamic, therefore you need to declare a report parameter first. Call this parameter
sortOrderand to add the parameter to the query.BIRT offers rich JavaScript API, so you can modify the query programmatically like this (the
xml-propertytag shown below should already be present in the report):<xml-property name="queryText">< ![CDATA[ SELECT productvendor, productname, quantityinstock, buyprice FROM CLASSICMODELS.PRODUCTS as products ]]> </xml-property> <method name="beforeOpen"> <![CDATA[ queryString = " ORDER BY products."+reportContext.getParameterValue("sortOrder")+" "+"DESC"; this.queryText = this.queryText+queryString; ]]> </method>The report is ready. You can preview it to make sure it works properly.
To set the report parameter you should create an
XHTMLpage, call itProductForm.xhtml, and place it in theWebContentfolder. On the page you can set the value of thesortOrderJava bean variable and click the button to open another view page that will display the resulted report.The source code of the
ProductForm.xhtmlshould be the following:<!DOCTYPE composition PUBLIC "-//W3C//DTD XHTML 1.0 Transitional//EN" "http://www.w3.org/TR/xhtml1/DTD/xhtml1-transitional.dtd"> <ui:composition xmlns="http://www.w3.org/1999/xhtml" xmlns:s="http://jboss.com/products/seam/taglib" xmlns:ui="http://java.sun.com/jsf/facelets" xmlns:h="http://java.sun.com/jsf/html" xmlns:f="http://java.sun.com/jsf/core" xmlns:rich="http://richfaces.org/rich" xmlns:a4j="http://richfaces.org/a4j" template="layout/template.xhtml"> <ui:define name="body"> <rich:panel> <f:facet name="header">BIRT Report Generator</f:facet> <a4j:form ajaxSubmit="true" reRender="criterion"> <table> <tr> <td>Select sort order criterion:</td> <td><h:selectOneMenu onchange="submit()" value="#{ReportJB.sortOrder}"> <!-- Bind to your Java Bean --> <f:selectItem itemValue="buyprice" itemLabel="buy price" /> <f:selectItem itemValue="quantityinstock" itemLabel="quantity in stock" /> </h:selectOneMenu> </td> </tr> </table> </a4j:form> <s:button view="/#{!empty reportParameters.order ? 'Products' : 'ProductsReport'}.xhtml" id="generate" value="Generate Report" /> <!-- If the sertOrder variable is not set the button won't work --> </rich:panel> </ui:define> </ui:composition>The logic of the file is quite simple: when the sort order criterion is selected the value of
ReportJB.sortOrderis set automatically via Ajax, and the report is ready to be generated.Now you need to create the web page that will print the report. Name the file
ProductsReport.xhtml. The file to output the report should have the following content:<!DOCTYPE composition PUBLIC "-//W3C//DTD XHTML 1.0 Transitional//EN" "http://www.w3.org/TR/xhtml1/DTD/xhtml1-transitional.dtd"> <ui:composition xmlns="http://www.w3.org/1999/xhtml" xmlns:s="http://jboss.com/products/seam/taglib" xmlns:ui="http://java.sun.com/jsf/facelets" xmlns:f="http://java.sun.com/jsf/core" xmlns:h="http://java.sun.com/jsf/html" xmlns:b="http://jboss.com/products/seam/birt" xmlns:rich="http://richfaces.org/rich" template="layout/template.xhtml"> <ui:define name="body"> <rich:panel> <f:facet name="header">Products Report</f:facet> <b:birt designType="embed" designName="products.rptdesign" embeddable="true" masterpage="true"> <b:param name="sortOrder" value="#{ReportJB.sortOrder}" /> </b:birt> </rich:panel> </ui:define> </ui:composition>As you know from Section 3.1, “Adding BIRT Functionality to Standard Seam Web Project”, before using the BIRT Integration framework tags on the page you need to declare the tag library and specify the name space with this line:
xmlns:b="http://jboss.com/products/seam/birt"
To set the
sortOrderreport parameter add this line:<b:param name="sortOrder" value="#{ReportJB.sortOrder}" />We bound the
sortOrderreport parameter to Java Bean variablevalue="#{ReportJB.sortOrder}"using EL expression, with theReportJB.sortOrdervariable having its value assigned in theProductsForm.xhtmlfile.Tip
By default if you embed a report into HTML page the HTML-format report contains the <html>, <head>, <body> etc., tags. However if your HTML page already has those tags, you can rid of them using the
embeddable="true"attribute of the <b:birt> component.Deploy the project onto the server and open your browser to see the report is successfully generated. You should navigate to http://localhost:8080/yourProjectName/ProductForm.seam to select the criterion and press the button. You will be redirected to http://localhost:8080/yourProjectName/ProductsReport.seam.

Thus, a Seam project that includes the BIRT facet can be deployed as any project. If you define the Hibernate ODA driver, the JBoss BIRT engine will use JNDI URL that has to be bound to either Hibernate Session Factory or Hibernate Entity Manager Factory. If you don't specify the JNDI URL property, our engine will try the following JNDI URLs:
java:/<project_name>
java:/<project_name>EntityManagerFactory
When creating a Seam EAR project, Hibernate Entity Manager Factory is bound to java:/{projectName}EntityManagerFactory. All you need to do is to use the Hibernate Configuration created automatically. You can use default values for the Hibernate Configuration and JNDI URL within the BIRT Hibernate Data Source.
When using a Seam WAR project, neither HSF nor HEMF are bound to JNDI by default. You have to do this manually. For instance, HSF can be bound to JNDI by adding the following property to the persistence.xml file:
<property name="hibernate.session_factory_name" value="java:/projectname"/>
And you can use java:/projectname as the JNDI URL property when creating a BIRT Hibernate Data Source.
Note:
If you want to test this feature using PDE Runtime, you need to add osgi.dev=bin to the WebContent/WEB-INF/platform/configuration/config.ini file.
In conclusion, the main goal of this document is to describe the full feature set that JBoss BIRT Tools provide. If you have any questions, comments or suggestions on the topic, please feel free to ask in the JBoss Tools Forum. You can also influence on how you want to see JBoss Tools docs in future leaving your vote on the article Overview of the improvements required by JBossTools/JBDS Docs users.