JBoss Developer Studio is especially designed for supporting JSF and JSF-related technologies. JBDS provides extensible and exemplary tools for building JSF-based applications as well as adding JSF capabilities to existing web projects, importing JSF projects (created outside JBDS) and choosing any JSF implementation while developing JSF application.
JBoss Developer Studio allows you to develop JSF applications much faster and with far fewer errors so sparing your time.
With JBoss Developer Studio, we don't lock you into any one JavaServer Faces implementation. Select the one you want to use for your project.
When you:
Create a new JSF project
Add JSF capability to any existing Eclipse project
Add JSF capability to any existing project (created outside JBDS)
You can always select which JSF implementation to use.
You can also create your own custom JSF environments.
JBoss Developer Studio will add all the required libraries for the selected version to your project.
Facelets extends JavaServer Faces by providing a lightweight framework that radically simplifies the design of presentation pages for JSF. JBoss Developer Studio provides support for Facelets in a variety of ways.
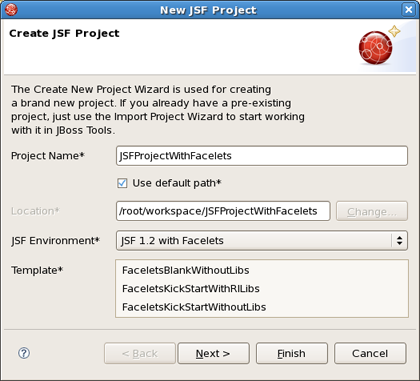
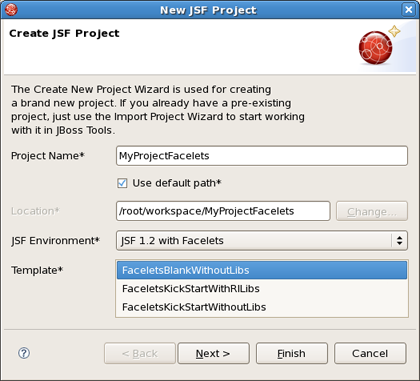
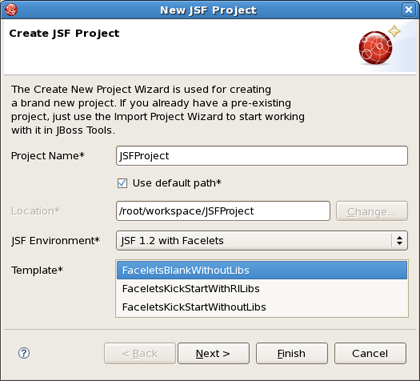
The Create New JSF Project wizard contains templates for creating Faceletsprojects based on version 1.2 of the JSF Reference Implementation:

Once you select the environment, you can select one of the six available templates:
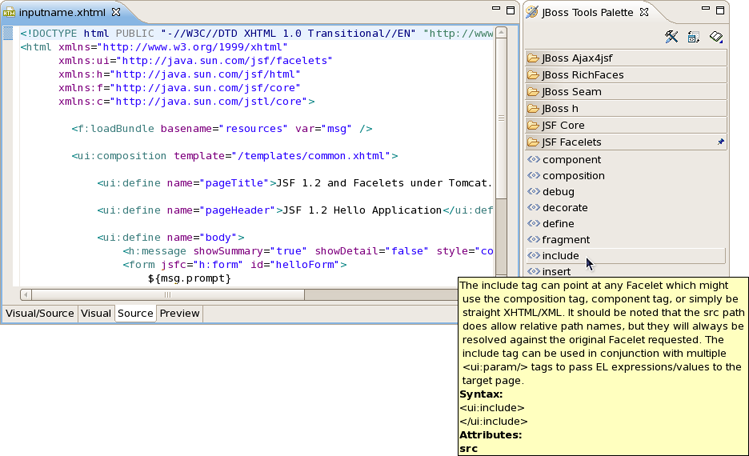
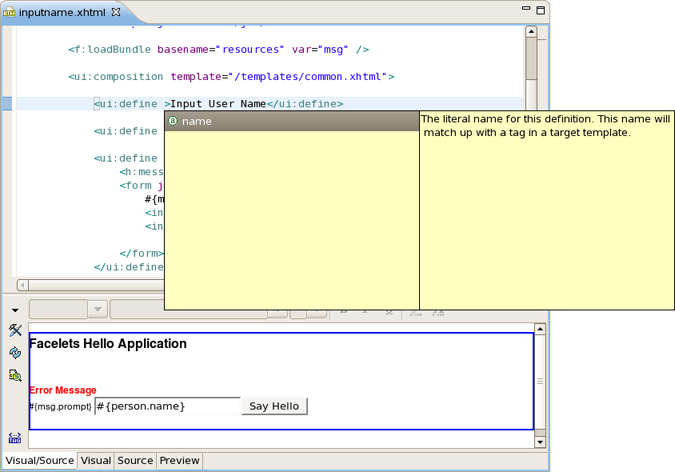
The JBoss Tools Palette comes with the Facelets components ready to use. A useful tip appears when you hover the mouse cursor over the tag:
Code assist for Facelets tags is available when editing xhtml files:
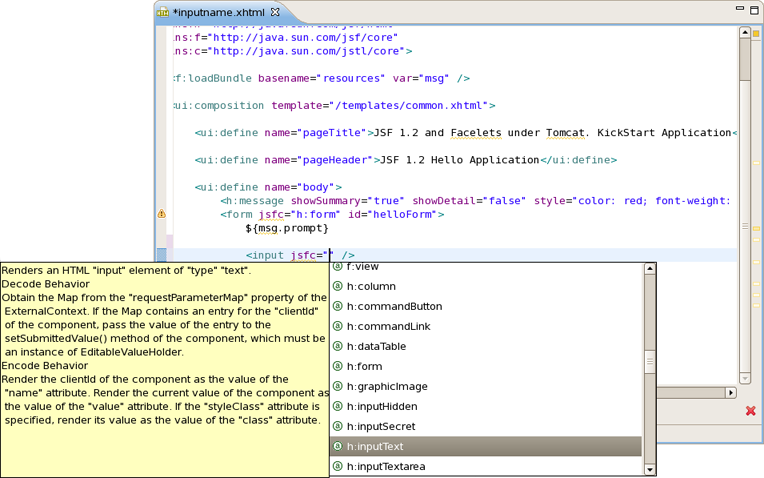
In any HTML tag you also get the code assist for "jsfc" attribute

Then you get the code assist for JSF components are available on the page
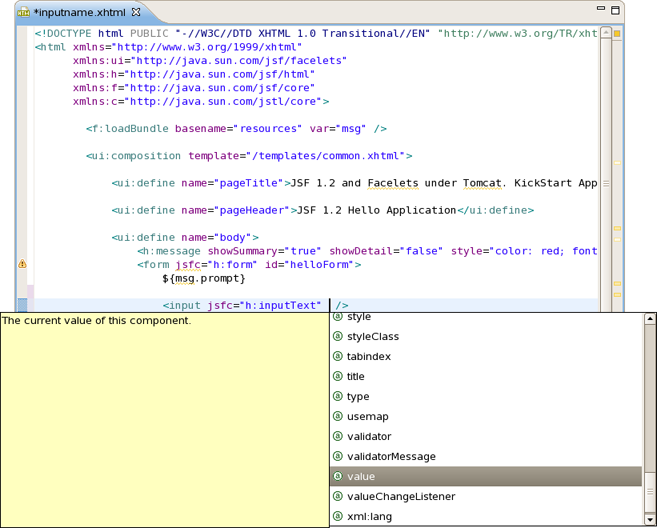
Then you will see all available attributes for the component.
Using JBoss Developer Studio OpenOn feature, you can easily navigate between the Facelets templates and other parts of your projects. Just by holding down the Control key while hovering the mouse cursor over a reference to a template, the reference becomes a hyperlink to open that template.
JBoss Developer Studio provides the following when working with JSF:
Create new JSF projects
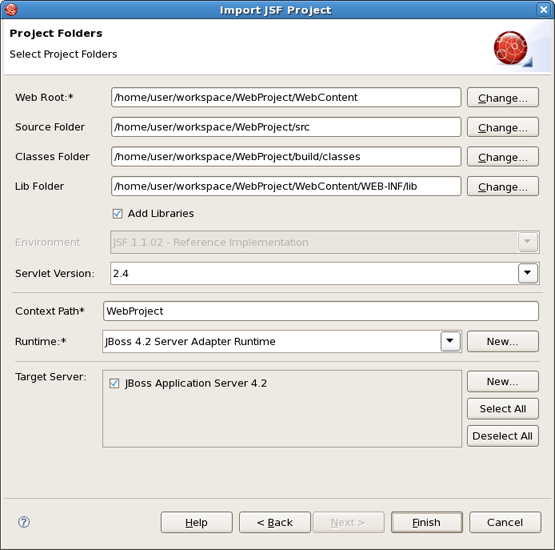
Import (open) existing JSF projects
Add JSF capability to any existing Eclipse project
Import and add JSF capability to any existing project created outside Eclipse
JBoss Developer Studio allows you to create brand new JSF projects . A new JSF project will have all JSF libraries, tag libraries and a JSF configuration file.
JBoss Developer Studio comes with a number of predefined project templates. These templates are flexible and easily customizable.
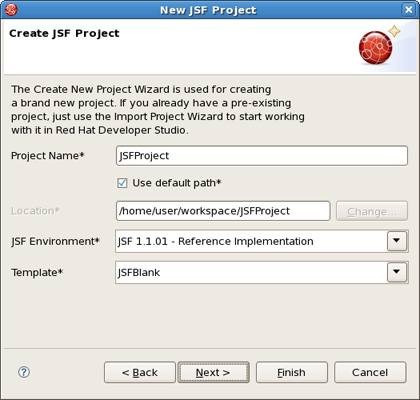
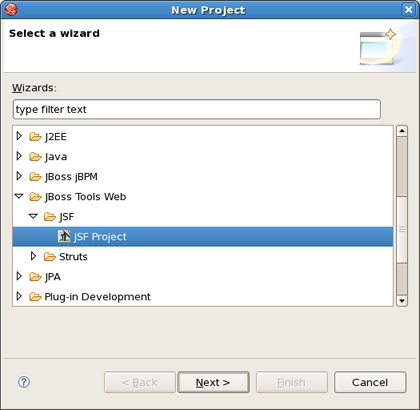
To create a brand new JSF project, select File > New > Project > JBoos Tools Web > JSF > JSF Project and click Next :
On this form enter Project Name. You can also select where to create the project.
JSF Version allows you to select which JSF implementation to use:
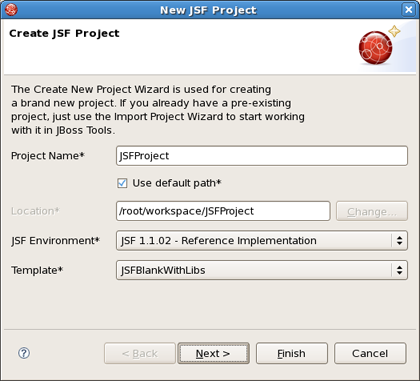
You can also pick a different template on which to base the project. Almost all templates come in two variations: with jsf libraries and without ones. Some servers already provide jsf libs and you take risk of getting conflicting libraries while deploying your project. So the idea here is to avoid such conflicts. Select a template without libs if you use a server with its own jsf libraries.
The JSFBlank template will create a standard Web project structure with all JSF capabilities.
The JSFKickStart template will create the same standard structure but will also include a sample application that is ready to run.
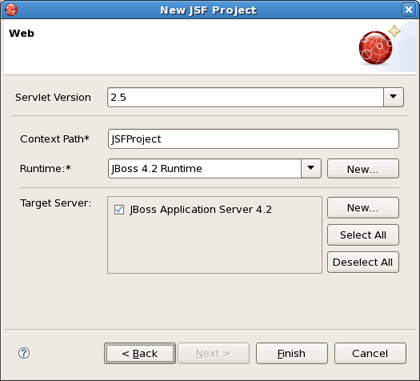
On the next screen select what Servlet version to use and whether to register this application with JBoss AS (or other server) for running and testing of your application.
Context Path is the name under which the application will be deployed.
The Runtime value tells Eclipse where to find Web libraries in order to build (compile) the project. It is not possible to finish project creation without selecting Runtime. If you don't have any values, select New... to add new Runtime.
Target Server allows you specify whether to deploy the application. The Target Server corresponds to the Runtime value selected above.
If you don't want to deploy the application, uncheck this value:
When you are all done, you should have the project that has been created in the Package Explorer view:
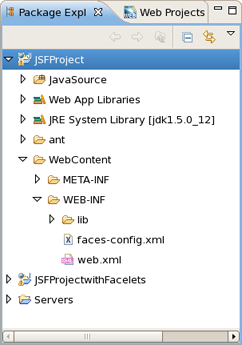
At this point you can open faces-config.xml and start working on your application.
For detailed information on migration projects to JBoss Developer Studio see Migration Guide.
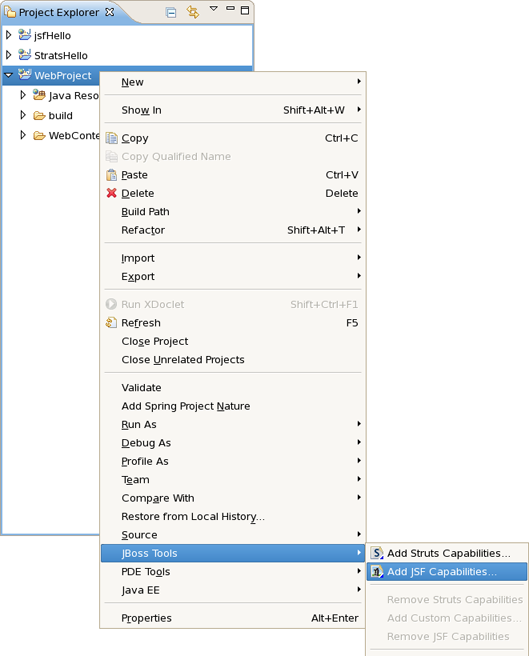
With JBoss Developer Studio you can add JSF capability (JSF libraries, tag libraries) to any existing Eclipse project in your workspace.
By adding JSF capability to your project, you can now edit any file using JBoss Developer Studio editors, such as JSF configuration editor, JBoss Tools JSP editor and any others.
Right click the project and select JBoss Tools > Add JSF Capabilities . This will start the process of adding all necessary libraries, files to make this a Web JSF project:
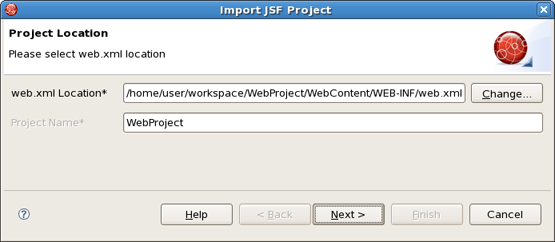
The wizard will first show you the web.xml file location and the project name:
On the last form you can set the different folders for your project as well as register this application with a servlet container.
Make sure to select Add JSF Libraries for JBoss Developer Studio to add all required JSF related libraries to this project.
Context Path is the name under which the application will be deployed.
The Runtime value tells Eclipse where to find Web libraries in order to build (compile) the project. It is not possible to finish project import without selecting Runtime. If you don't have any values, select New... to add new Runtime.
Target Server allows you specify whether to deploy the application. The Target Server corresponds to the Runtime value selected above.
If you don't want to deploy the application, uncheck this value:
Once your project is imported you can see that JSF related libraries have been added to your project jsf-api.jar and jsf-impl.jar.
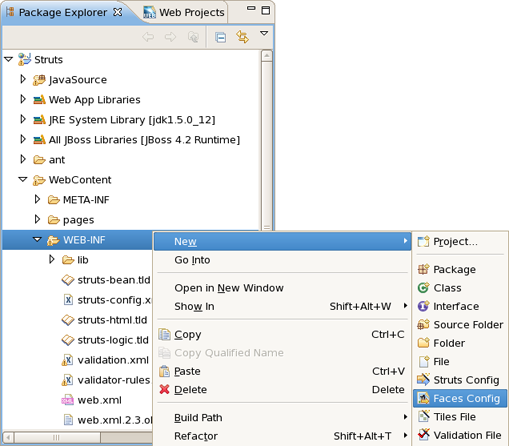
You are now ready to work with JSF by creating a new JSF configuration file:
JBoss Developer Studio has a powerful templating capability for creating new and importing existing Struts and JSF projects. This templating facility has a variety of aspects to consider. But, let's start with the most straightforward case.
Let's say you have a project that you want to use as the basis for a new template. Follow these steps to make a template out of it:
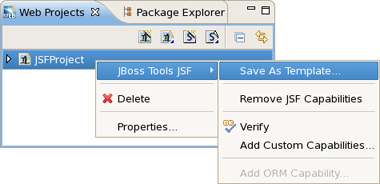
In the Web Projects view, right-click the project and select JBoss Tools JSF > Save As Template as template
In the first dialog box, you can choose a name for the template (defaults to the project name) and confirm what run-time implementation of the project's technology will be used
Select Next and you will be sent to a dialog box with your project structure displayed with check boxes. Here you can check only those parts and files in your project directory that should be part of the template
At this point, unless you want to designate some extra files as having Velocity template coding inside them, you should select Finish
That's it. Now, you can use this template with any new or imported project that uses the same run-time implementation as the project you turned into a template.
The JSF configuration file editor has three main viewers (modes):
Diagram
Tree
Source
The modes can be selected via the tabs at the bottom of the editor.
The JSF configuration editor also comes with a very useful OpenOn selection feature.
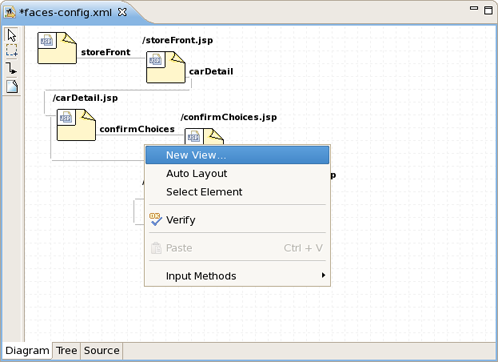
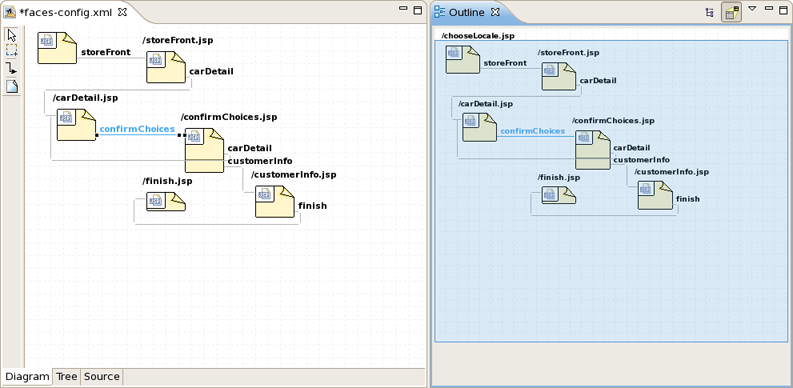
The Diagram view displays the navigation rules in the JSF configuration file:
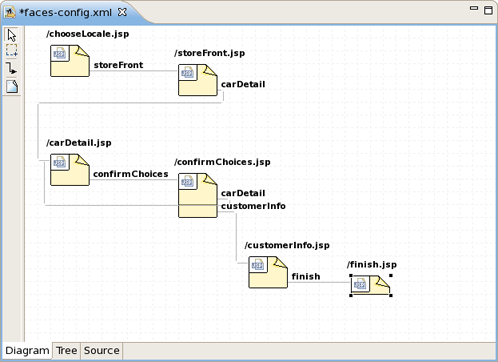
To create a new page (view), you can click the page icon on this toolbar and then click anywhere on the diagram. A New Page Wizard will appear.
To create a transition (rule) connecting pages:
Select the transition icon from the toolbar (2nd from the bottom).
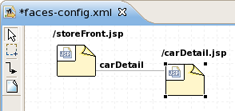
Click the source page.
Click the target page.
A transition will appear between the two pages:
It is also possible to create a new page by right-clicking anywhere on the diagram and selecting New View .
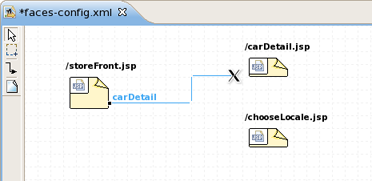
To edit an existing transition, first select the transition line. Then, place the mouse cursor over the last black dot (on the target page). The mouse cursor will change to a big +. At this point, drag the line to a new target page:
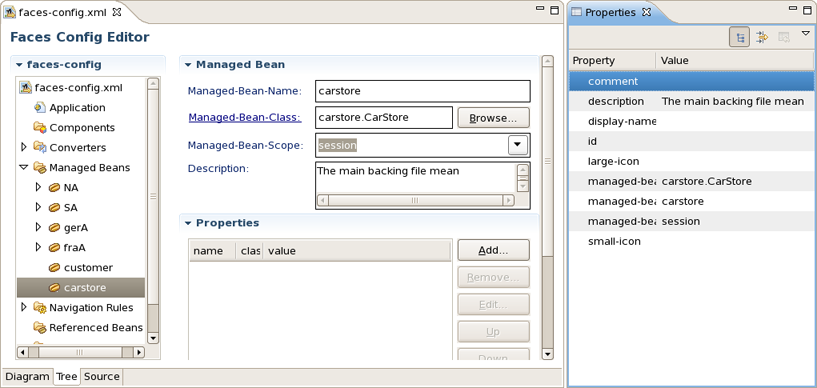
The Tree mode for the editor displays all JSF application artifacts referenced in the configuration file in a tree format. Select any node and its properties will appear in the right-hand area:
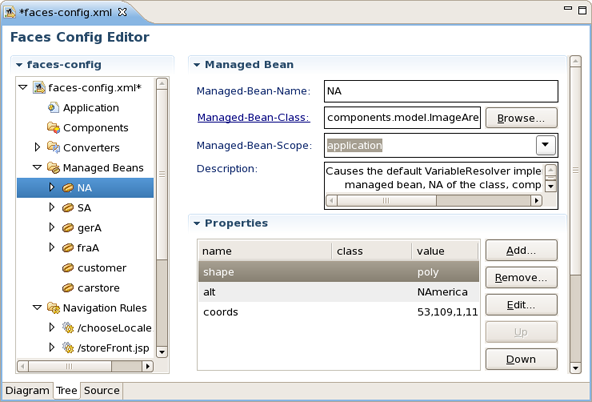
To edit, right-click any node and select one of the available actions in the context menu. You can also edit in the properties window to the right:
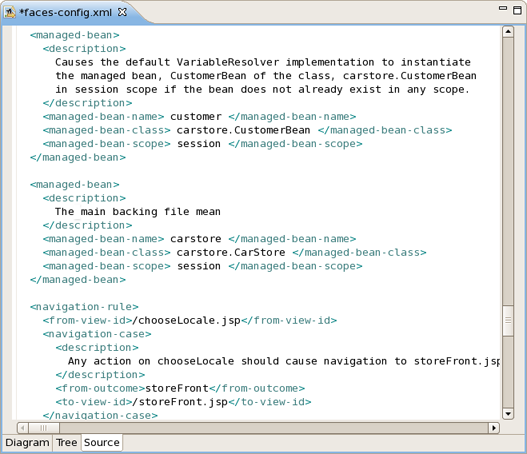
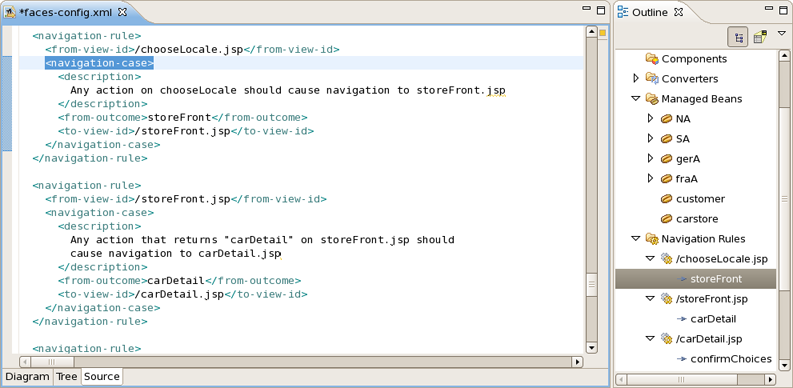
The Source mode for the editor displays a text view of the JSF configuration file. All three viewers are always synchronized, so any changes made in one of the viewers will immediately appear in the others:
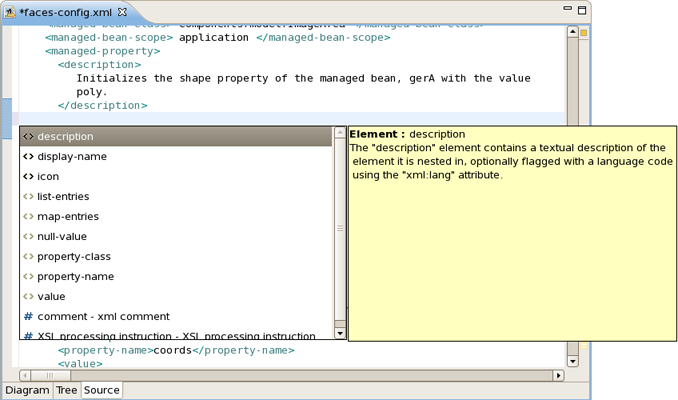
Content assist is always available in the Source viewer:
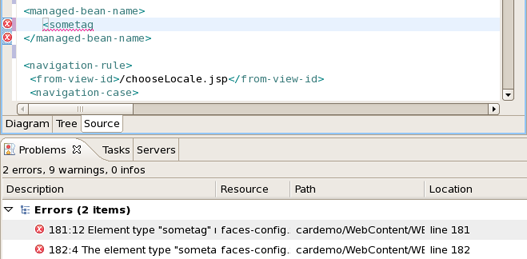
Errors will be reported by JBoss Developer Studio's verification facility:
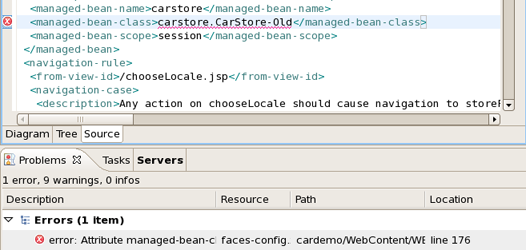
Other errors are also reported.
You can also work in the Source viewer with the help of the Outline view . The Outline views show a tree structure of the JSF configuration file. Simply select any element in the Outline view, and it will jump to the same place in the Source viewer.
If your diagram is large, within Outline view you can switch to a Diagram Navigator mode by selecting the middle icon at the top of the view window. It allows you to easily move around the diagram. Just move the blue area in any direction, and the diagram on the left will also move:
You can also edit in the Tree viewer with the help of the Properties view as shown below:
JBoss Developer Studio gives you lots of power to work with managed beans.
Add and generate code for new managed beans
Generate code for attributes and getter/setter methods
Add existing managed beans to JSF configuration file
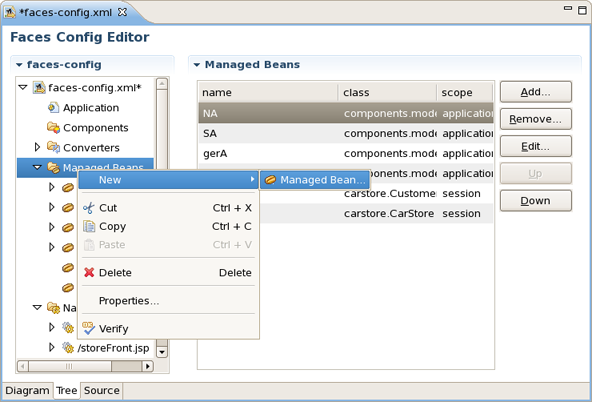
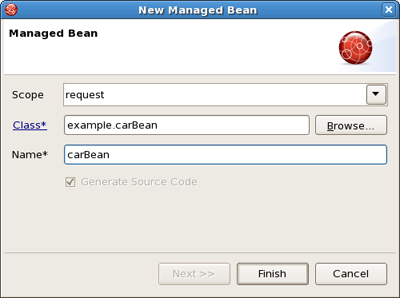
To start, create a new managed bean in JSF configuration file editor, in the Tree view.
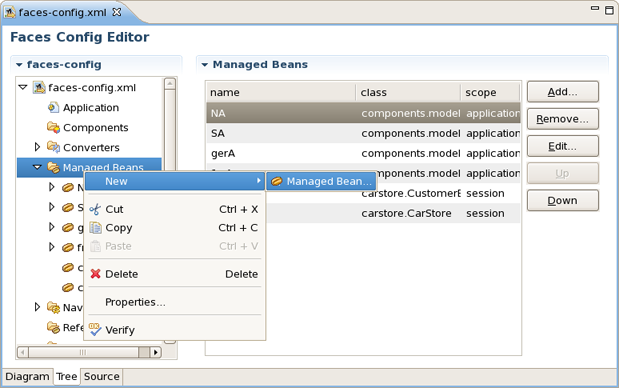
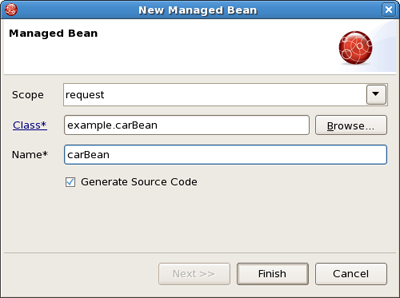
When you define a new managed bean, make sure that Generate Source Code is checked as shown in the figure below:
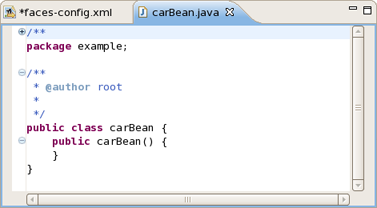
After the "Java" class has been generated you can open it for additional editing. There are two ways to open the "Java" class:
Click on Managed-Bean-Class link in the editor -or-
Right click the managed bean and select Open Source

The generated Java source:
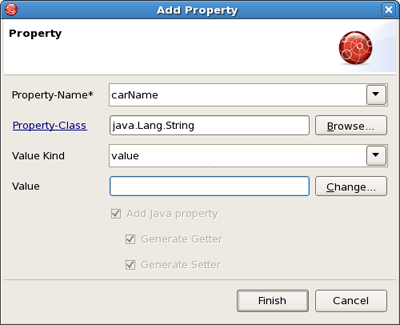
You can also generate source code for properties - this also includes "getter" and "setter" methods:
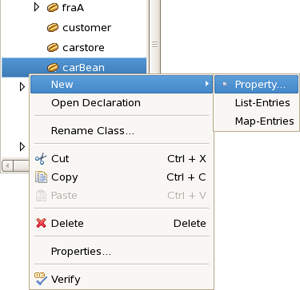
Make sure that all the check boxes are selected:
- Add Java property
- Generate Getter
- Generate Setter
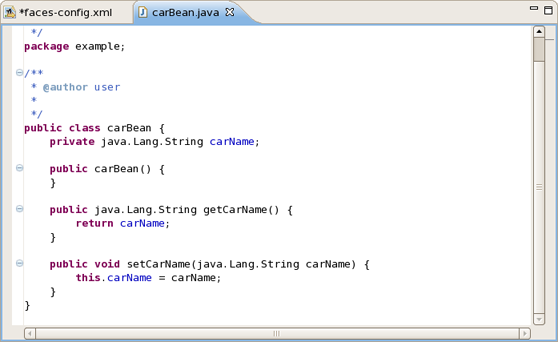
Once the generation is complete, you can open the file and see the added property with "getter" and "setter" methods:
If you already have a Java bean you can easily add it to a JSF configuration file.
You should start the same way you create a new managed bean. Use Browse... to add your existing Java class.
Once the class is set, it's Name will be set as well. But you can easily substitute it for the other one. Notice that Generate Source Code option is not available as the "Java" class already exists.
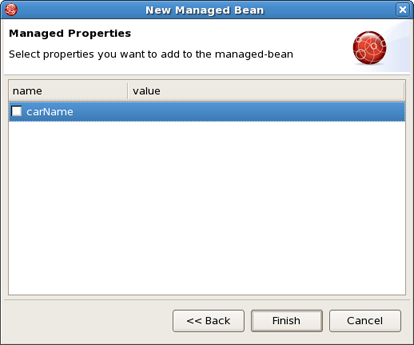
After adding your class Next button will be activated. Pressing it you'll get Managed Properties dialog where all corresponding properties are displayed. Check the necessary ones to add them into your JSF Configuration File.
If you don't want to add any, just click Finish .
In the Project Explorer view open faces-config.xml and select Tree tab.
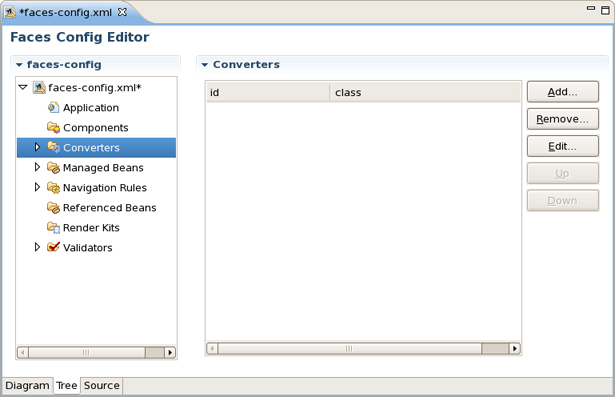
Select Converters and click on Add button.
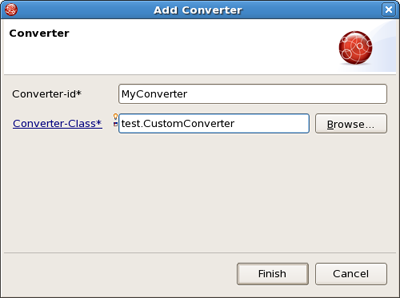
Type the name of your converter in the Converter-id field and name of the class for converters. After clicking Finish button your custom converter is registered under entered name.
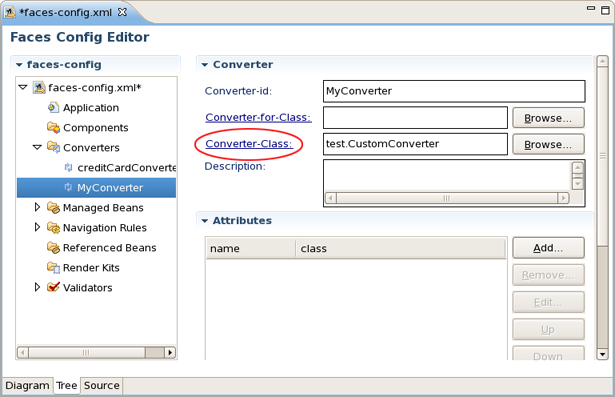
Let's create "converter" class. In the Converter section you should see your Converter-id and Converter-class. Click on Converter-class to generate the source code.
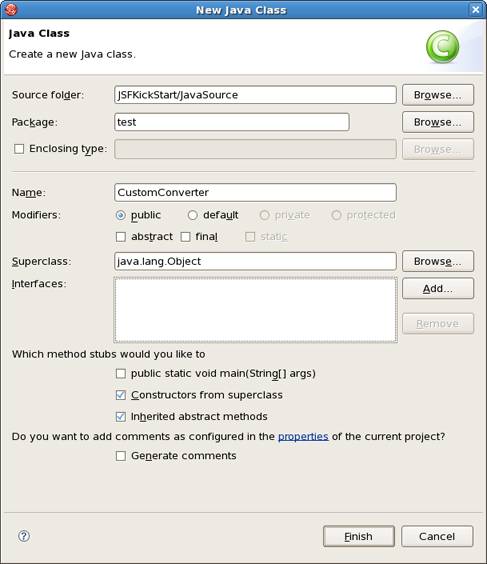
Java class will be created automatically. Leave everything without changes and click Finish .
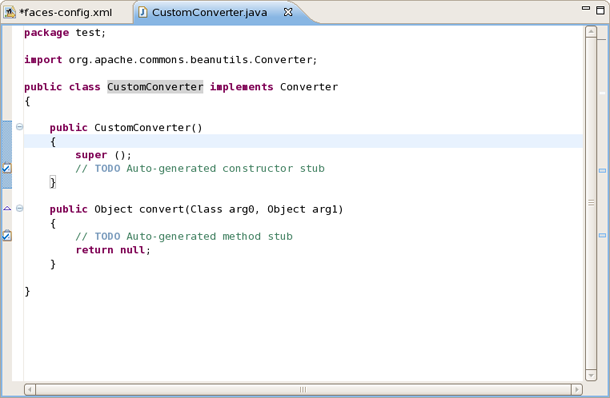
To open converter class click again on Converter-class link in the Converter section. Now you are able to write business logic of converter.
In the Project Explorer view open faces-config.xml and select Tree tab.
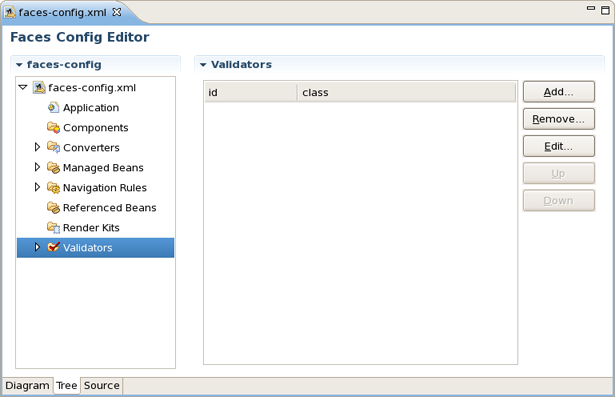
Select Validators , and click on Add button.
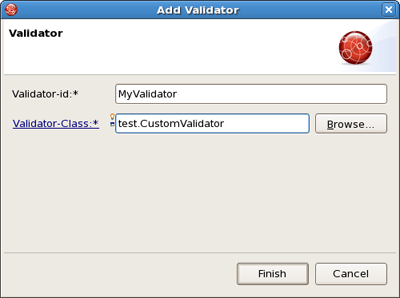
Type the name of your validator in the Valifator-id field an d name of the class for validators. After clicking Finish button your custom validator is registered under entered name.
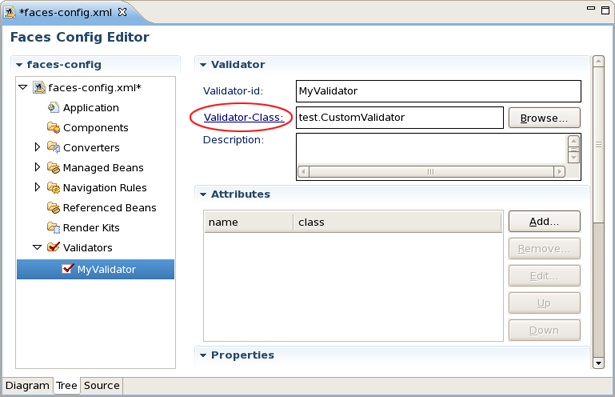
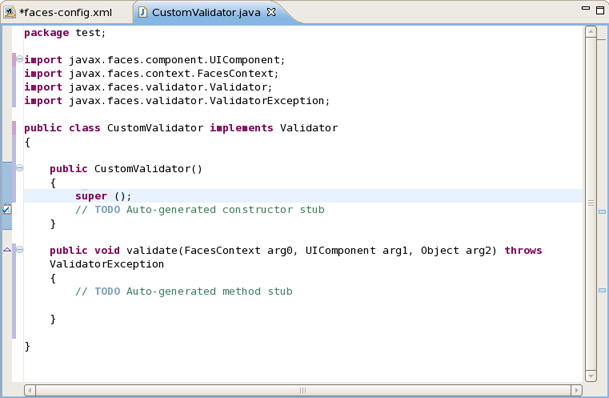
Let's create "validator" class. In the Validator section you should see your Validator-id and Validator-class. Click on Validator-class to generate the source code.
Java class will be created automatically. Leave everything without changes and click Finish .

To open validator class click again on Validator-class in the Validator section. Now you are able to write business logic of validator.
In the Project Explorer view open faces-config.xml and select Tree tab.
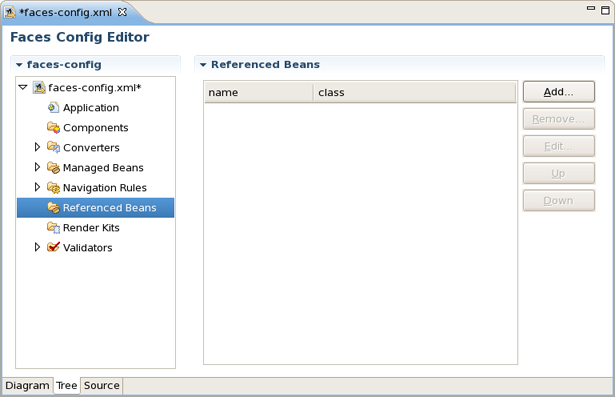
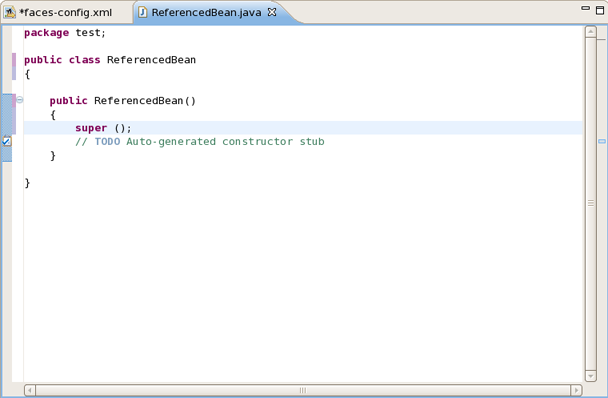
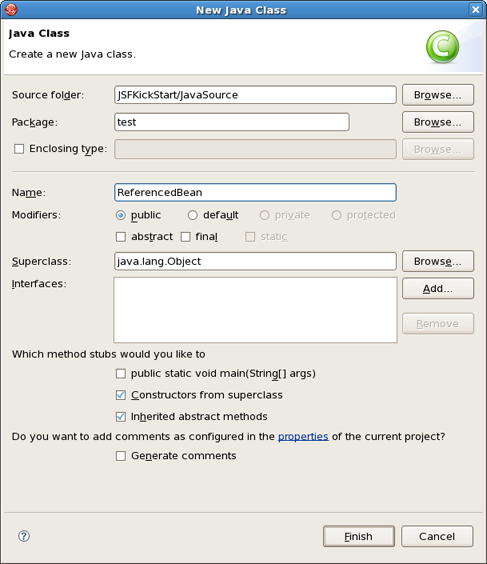
Select Referenced Beans and click on Add button.
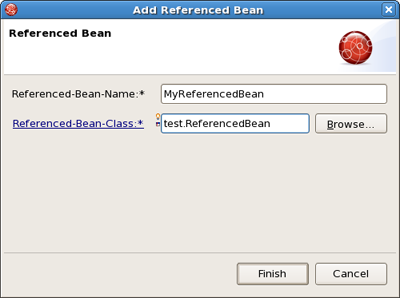
Type in the name of your Referenced Bean and type in or select Referenced-Bean-Class by using Browse button.
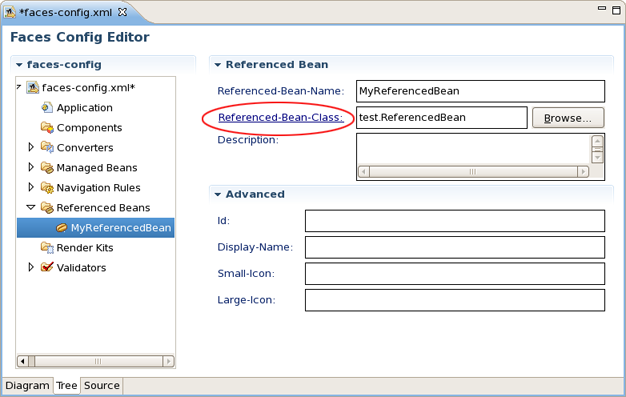
In the Referenced Bean section you should see your Referenced-Bean-Name and Referenced-Bean-Class. Click on the link to open the Java creation wizard.
Java class will be created automatically. Leave everything without changes and click Finish .
To open Referenced Bean class click again on Referenced-Bean-Class in the Referenced Bean section. Now you are able to write business logic of Referenced Bean.