This chapter includes detailed reference information about JBoss Portlet Tools.
In order to a web project with portlets could be deployed to JBoss Portal, it should include certain descriptors. The next table lists and describes these configuration files.
Table 3.1. JBoss Portlet Descriptors
| Name | Description |
|---|---|
| portlet.xml | The mandatory portlet descriptor defined by the JSR-168 Portlet Specification. It is used during deployment. |
| portlet-instances.xml | The optional JBoss Portal specific descriptor. It allows to create a portlet instance from a portlet class definition. |
| *-object.xml | The optional JBoss Portal specific descriptor. It helps define the layout of the portal. |
| jboss-portlet.xml | The optional JBoss Portal specific descriptor. It allows to use JBoss specific functionality within a portlet application. |
For more detail information about each descriptor, see "Portlet Descriptors" in Chapter 6, "JBoss Portal Reference Guide".
This section describes the JBoss Portlet Tools wizards:
The Java Portlet wizard helps you create a new Java portlet (1.0 or 2.0). It is based on the WTP's Create Servlet wizard, but adapted to JBoss Portlet. You can call it from the File or context menu of your project by following to New > Other > JBoss Tools Web > Portlet > Java Portlet.
The wizard consists of the four pages:
The first one includes the next options to adjust:
Table 3.2. Java Portlet Wizard. First Page Options.
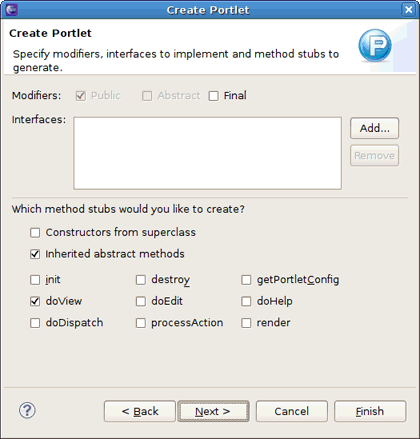
Option Description Default Project Select the project to add a new Java portlet The project selected when the wizard has been started Source folder The path to the source folder relative to the selected project The source folder of the project selected in the Project field Java package Enter a package to contain a new portlet. Either type a valid package name or click Browse to select a package via the dialog box. <blank> Class name Type a name for a new Java portlet class <blank> Superclass Type or click Browse to select a superclass for a Java portlet class javax.portlet.GenericPortlet Use an existing Portlet class Select this check box if you want to use an existing Java portlet class. In the appeared Class name field type or click Browse to select an existing portlet class. Cleared The second wizard page is for specifying modifiers, interfaces to implement and method stubs to generate.
The descriptions of the options listed on this page are in the following table.
Table 3.3. Java Portlet Wizard. Second Page Options.
Option Description Default Modifiers Select one or more access modifiers for a new Java portlet class: Public
Abstract
Final
Public Interfaces Click Add to choose interfaces that a new class implements <blank> Which method stubs would you like to create? Choose which methods from superclass to override in the Java portlet class: Constructors from superclass
Inherited abstract methods
init
doView
doDispatch
destroy
doEdit
processAction
getPortletConfig
doHelp
render
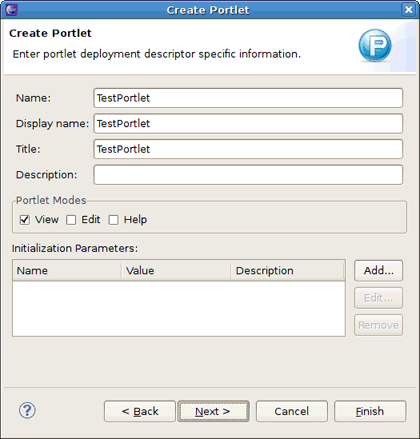
Inherited abstract methods, doView The third page is for adjusting the portlet deployment descriptor settings.
Table 3.4. Java Portlet Wizard. Third Page Options.
Option Description Default Name Enter the portlet name. It does not have to be the portlet class name. The name of the portlet class Display name Enter the display name of the Java portlet The name of the portlet class Title Enter the title of the portlet The name of the portlet class Description Enter the description of the portlet's function <blank> Portlet Modes Select one or more of three modes defined by the JSR-286 specification: View - generates markup reflecting the current state of the portlet;
Edit - allows customizing the behavior of the portlet;
Help - provides an information on how to use the portlet.
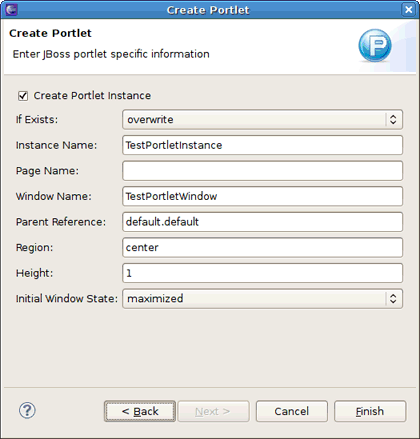
View Initialization Parameters Specify initialization parameters to create an initial state inside your portlet class. Click Add and fill in the Name, Value and Description (optional) fields to set a parameter. <blank> The last wizard page helps configure the JBoss Portlet specific descriptors.
Table 3.5. Java Portlet Wizard. Last Page Options.
Option Description Default Create Portlet Instance Clear the Create Portlet Instance check box, if you don't wont the wizard to create the deployment elements in the default-object.xmlandportlet-instances.xmlfilesSelected If Exists Select one of two options: overwrite - destroys the existing object and creates a new one based on the content of the deployment
keep - maintains the existing object deployment or creates a new one if it does not exist
overwrite Instance Name Enter a name of the portlet instance that the portlet window represents [Portlet class name]Instance Page Name If set, the portlet page is created with the name defined <blank> Window Name Enter a name of the portlet window [Portlet class name]Window Parent Reference Define a reference to the parent object. The syntax for this element is
[portal-instance].[portal-page].For example,
default.defaultmeans that the window appears on the default page, in the default portal.default.default Region Specify the region where the window should appear on the page center Height Define the height of the window 1 Initial Window State Set the window state indicator by selecting one of three states defined by the JSR-168 specification: normal - a portlet shares this page with other portlets
minimized - a portlet may show very little information or none at all
maximized - a portlet may be the only portlet displayed on this page
maximized
The JSF/Seam Portlet wizard, that is merged into one JSF and Seam Portlet wizards, helps you create a JSF/Seam portlet that uses the JBoss Portlet Bridge libraries. The default values in this wizard depend on the configuration set for the project. For instance, if you set the JSF configuration, the default values in this wizard will be as for a JSF portlet.
The JSF/Seam Portlet wizard could be started from the File or context menu of your project by following to New > Other > JBoss Tools Web > Portlet > JSF/Seam Portlet.
The wizard includes three pages to adjust JSF/Seam portlet setting:
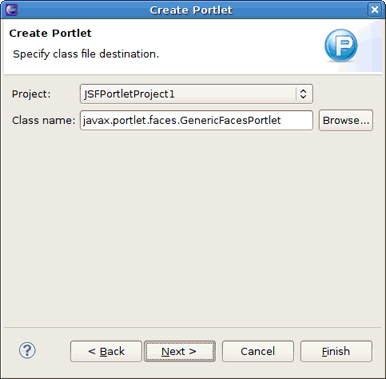
The first wizard page asks to select a project to add JSF/Seam portlet and set a class file destination.
Table 3.6. JSF/Seam Portlet Wizard. First Page Options.
Option Description Default Project Select the project to add a new JSF/Seam portlet The project selected when the wizard has been started Class name Type or click Browse to select a class for a JSF/Seam portlet javax.portlet.faces.GenericFacesPortlet The second page allows to configure a portlet deployment descriptors.
Table 3.7. JSF/Seam Portlet Wizard. Second Page Options.
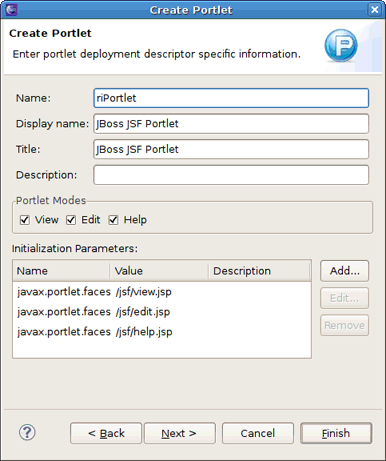
Option Description Default (JSF / Seam) Name Enter the portlet name. It does not have to be the portlet class name. riPortlet / seamPortlet Display name Enter the display name of the Java portlet JBoss JSF Portlet / JBoss Seam Portlet Title Enter the title of the portlet JBoss JSF Portlet / JBoss Seam Portlet Description Enter the description of the portlet's function <blank> Portlet Modes Select one or more of three modes defined by the JSR-286 specification: View - generates markup reflecting the current state of the portlet
Edit - allows customizing the behavior of the portlet
Help - provides an information on how to use the portlet
View, Edit, Help / View Initialization Parameters Specify initialization parameters to create an initial state inside your portlet class. Click Add and fill in the Name, Value and Description (optional) fields to set a parameter. javax.portlet.faces.defaultViewId.view, javax.portlet.faces.defaultViewId.edit, javax.portlet.faces.defaultViewId.help / javax.portlet.faces.defaultViewId.view The last wizard page helps you configure the JBoss Portlet specific information.
Table 3.8. JSF/Seam Portlet Wizard. Third Page Options.
Option Description Default (JSF / Seam) Create Portlet Instance Clear the Create Portlet Instance check box, if you don't wont the wizard to create the deployment elements in the default-object.xmlandportlet-instances.xmlfilesSelected If Exists Select one of two options: overwrite - destroys the existing object and creates a new one based on the content of the deployment
keep - maintains the existing object deployment or creates a new one if it does not exist
overwrite Instance Name Enter a name of the portlet instance that the portlet window represents JSFPortletInstance / SeamPortletInstance Page Name If set, the portlet page is created with the name defined JSFPortlet / SeamPortlet Window Name Enter a name of the portlet window JSFPortletWindow / SeamPortletWindow Parent Reference Define a reference to the parent object.
For example,
defaultmeans that the page appears in the default portal.default Region Specify the region where the window should appear on the page center Height Define the height of the window 1 Initial Window State Set the window state indicator by selecting one of three states defined by the JSR-168 specification: normal - a portlet shares this page with other portlets
minimized - a portlet may show very little information or none at all
maximized - a portlet may be the only portlet displayed on this page
maximized Create JBoss Application Select to add the
jboss-app.xmldescriptor.riPortletApp / seamPortletApp - the default name of the JBoss application. You can change it by typing a new one in the JBoss Application Name field.
Selected Add the jboss-portlet.xml file Select to create the jboss-portlet.xmlfileSelected Copy JSF Templates Select to add the folder with JSF templates ( edit.jsp,help.jsp,view.jsp) to the projectCleared

To open JBoss Portlet Preferences property sheet, go to → and then →
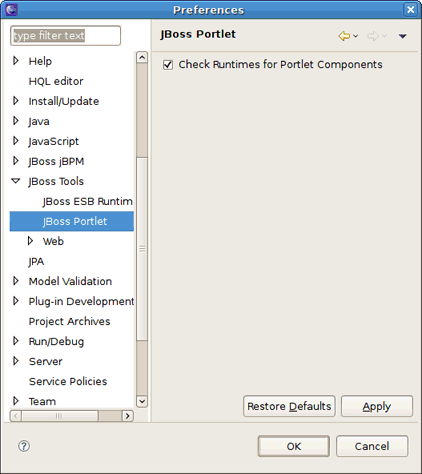
The Check runtimes for Portlet Components option makes the JBoss Portlet functionality always visible no matter what the runtime is set. By default the option is checked.