The following examples demonstrate the use of Arquillian. Currently Arquillian is distributed as a Maven only project, so you'll need to grab the examples from Git. You can choose between a JUnit example and a TestNG example. In this tutorial we show you how to use both.
git clone git://github.com/arquillian/arquillian.git arquillian
cd arquillian
git checkout 1.0.0.Alpha4
If you want to try the JUnit examples do:
cd examples/junitOr if you want to try the TestNG examples do:
cd examples/testng
Running these tests from the command line is easy. The examples run against all the servers supported
by Arquillian (of course, you must choose a container that is capable of deploying EJBs for these tests).
To run the test, we'll use Maven. For this tutorial, we'll use JBoss AS 6 (currently at Milestone 3), for
which we use the jbossas-remote-6 profile.
First, make sure you have a copy of JBoss AS; you can download it from jboss.org.
We strongly recommend you use a clean copy of JBoss AS. Unzip JBoss AS to a directory of your choice and start it; we'll
use $JBOSS_HOME to refer to this location throughout the tutorial.
$ unzip jboss-6.0.0.20100721-M4.zip && mv jboss-6.0.0.20100721-M4 $JBOSS_HOME && $JBOSS_HOME/bin/run.sh
Now, we tell Maven to run the tests, for both JUnit and TestNG:
$ mvn test -Pjbossas-remote-6

$ cd ../arquillian-example-junit/
$ mvn test -Pjbossas-remote-6
You can also run the tests in an IDE. We'll show you how to run the tests in Eclipse, with m2eclipse installed, next.
Before running an Arquillian test in Eclipse, you must have the plugin for the unit testing framework you are using installed. Eclipse ships with the JUnit plugin, so you are already setup if you selected JUnit. If you are writing your tests with TestNG, you need the Eclipse TestNG plugin.
Since the examples in this guide are based on a Maven 2 project, you will also need the m2eclipse plugin. Instructions for using the m2eclipse update site to add the m2eclipse plugin to Eclipse are provided on the m2eclipse home page. For more, read the m2eclipse reference guide.
Once the plugins are installed, import your Maven project into the Eclipse workspace. Before executing the
test, you need to enable the profile for the target container, as we did on the command line. We'll
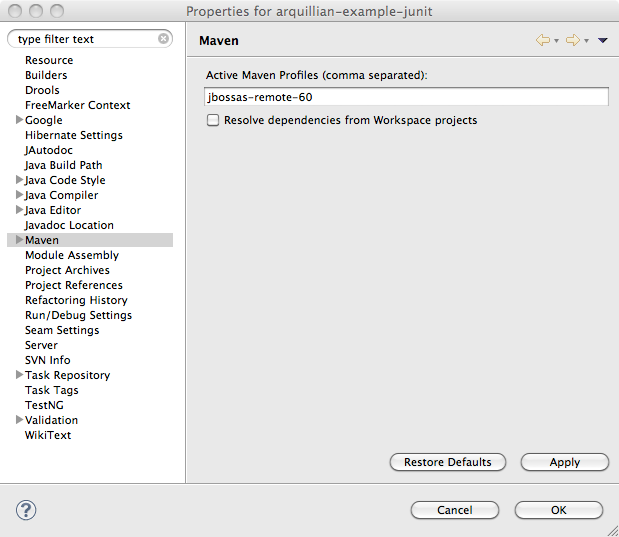
go ahead and activate the profile globally for the project (we also need the default profile, read the note above for more). Right click on the project and select Properties.
Select the Maven property sheet and in the first form field, enter jbossas-remote-6; you also need
to tell Maven to not resolve dependencies from the workspace (this interferes with resource loading):

Maven settings for project
Click OK and accept the project changes. Before we execute tests, make sure that Eclipse has properly processed all the resource files by running a full build on the project by selecting Clean from Project menu. Now you are ready to execute tests.
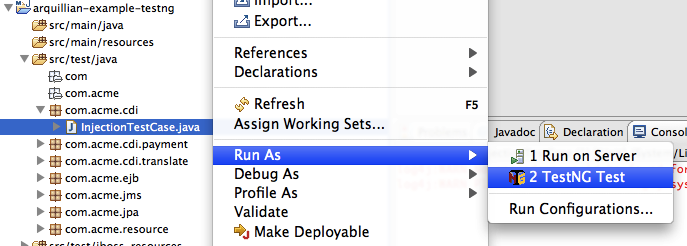
Assuming you have JBoss AS started from running the tests on the command line, you can now execute the tests. Right click on the InjectionTestCase.java file in the Package Explorer and select Run As... > JUnit Test or Run As... > TestNG Test depending on which unit testing framework the test is using.

Running the test from Eclipse using TestNG
You can now execute all the tests from Eclipse!
Here's a JUnit Arquillian test that validates the behavior of the EJB session bean
GreetingManager. Arquillian looks up an instance of the EJB session bean in the test archive
and injects it into the matching field type annotated with @EJB.
import javax.ejb.EJB;

import org.jboss.arquillian.api.Deployment;

import org.jboss.arquillian.junit.Arquillian;

import org.jboss.shrinkwrap.api.ShrinkWrap;

import org.jboss.shrinkwrap.api.spec.JavaArchive;

import org.junit.Assert;

import org.junit.Test;

import org.junit.runner.RunWith;


@RunWith(Arquillian.class)

public class InjectionTestCase {

   @Deployment

   public static JavaArchive createTestArchive() {

      return ShrinkWrap.create(JavaArchive.class, "test.jar")

         .addClasses(GreetingManager.class, GreetingManagerBean.class);

   }


   @EJB

   private GreetingManager greetingManager;


   @Test

   public void shouldBeAbleToInjectEJB() throws Exception {

      String userName = "Earthlings";

      Assert.assertEquals(Hello " + userName, greetingManager.greet(userName));

   }

}
The TestNG version of this test looks identical, except that it extends the
org.jboss.arquillian.testng.Arquillian class rather than being annotated with
@RunWith.
Here's an example of an JUnit Arquillian test that validates the GreetingManager EJB session
bean again, but this time it's injected into the test class using the @Inject annotation.
You could also make GreenManager a basic managed bean and inject it with the same
annotation. The test also verifies that the CDI BeanManager instance is available and gets
injected. Notice that to inject beans with CDI, you have to add a beans.xml file to the test archive.
import javax.enterprise.inject.spi.BeanManager;

import javax.inject.Inject;

import org.jboss.arquillian.api.Deployment;

import org.jboss.arquillian.junit.Arquillian;

import org.jboss.shrinkwrap.api.ShrinkWrap;

import org.jboss.shrinkwrap.api.ArchivePaths;

import org.jboss.shrinkwrap.api.spec.JavaArchive;

import org.jboss.shrinkwrap.api.asset.EmptyAsset;

import org.junit.Assert;

import org.junit.Test;

import org.junit.runner.RunWith;

import com.acme.ejb.GreetingManager;

import com.acme.ejb.GreetingManagerBean;


@RunWith(Arquillian.class)

public class InjectionTestCase

{

   @Deployment

   public static JavaArchive createTestArchive() {

      return ShrinkWrap.create(JavaArchive.class, "test.jar")

         .addClasses(GreetingManager.class, GreetingManagerBean.class)

         .addManifestResource(EmptyAsset.INSTANCE, ArchivePaths.create("beans.xml"));

   }


   @Inject GreetingManager greetingManager;


   @Inject BeanManager beanManager;


   @Test

   public void shouldBeAbleToInjectCDI() throws Exception {

      String userName = "Earthlings";

      Assert.assertNotNull("Should have the injected the CDI bean manager", beanManager);

      Assert.assertEquals("Hello " + userName, greetingManager.greet(userName));

   }

}
In order to test JPA, you need both a database and a persistence unit. For the sake of example, let's assume we are going to use the default datasource provided by the container and that the tables will be created automatically when the persistence unit starts up. Here's a persistence unit configuration that satisfies that scenario.
<?xml version="1.0" encoding="UTF-8"?>

<persistence version="1.0"

   xmlns="http://java.sun.com/xml/ns/persistence"

   xmlns:xsi="http://www.w3.org/2001/XMLSchema-instance"

   xsi:schemaLocation="

      http://java.sun.com/xml/ns/persistence

      http://java.sun.com/xml/ns/persistence/persistence_1_0.xsd">

   <persistence-unit name="users" transaction-type="JTA">

      <provider>org.hibernate.ejb.HibernatePersistence</provider>

      <jta-data-source>java:/DefaultDS</jta-data-source>

      <properties>

         <property name="hibernate.hbm2ddl.auto" value="create-drop" />

         <property name="hibernate.dialect" value="org.hibernate.dialect.HSQLDialect" />

      </properties>

   </persistence-unit>

</persistence>
Now let's assume that we have an EJB session bean that injects a persistence context and is responsible for
storing and retrieving instances of our domain class, User. We've catered it a bit to the
test for purpose of demonstration.
public @Stateless class UserRepositoryBean implements UserRepository {

   @PersistenceContext EntityManager em;


   public void storeAndFlush(User u) {

      em.persist(u);

      em.flush();

   }


   public List<User> findByLastName(String lastName) {

      return em.createQuery("select u from User u where u.lastName = :lastName")

         .setParameter("lastName", lastName)

         .getResultList();

   }

}
Now let's create an Arquillian test to ensure we can persist and subsequently retrieve a user. Notice that we'll need to add the persistence unit descriptor to the test archive so that the persistence unit is booted in the test archive.
public class UserRepositoryTest extends Arquillian {

   @Deployment

   public static JavaArchive createTestArchive() {

      return ShrinkWrap.create(JavaArchive.class, "test.jar")

         .addClasses(User.class, UserRepository.class, UserRepositoryBean.class)

         .addManifestResource(

            "test-persistence.xml",

            ArchivePaths.create("persistence.xml"));

   }


   private static final String FIRST_NAME = "Agent";

   private static final String LAST_NAME = "Kay";


   @EJB

   private UserRepository userRepository;


   @Test

   public void testCanPersistUserObject() {

      User u = new User(FIRST_NAME, LAST_NAME);

      userRepository.storeAndFlush(u);


      List<User> users = userRepository.findByLastName(LAST_NAME);


      Assert.assertNotNull(users);

      Assert.assertTrue(users.size() == 1);


      Assert.assertEquals(users.get(0).getLastName(), LAST_NAME);

      Assert.assertEquals(users.get(0).getFirstName(), FIRST_NAME);

   }

}
Here's another JUnit Arquillian test that exercises with JMS, something that may have previously seemed very
tricky to test. The test uses a utility class QueueRequestor to encapsulate the low-level
code for sending and receiving a message using a queue.
import javax.annotation.Resource;

import javax.jms.*;

import org.jboss.arquillian.api.Deployment;

import org.jboss.arquillian.junit.Arquillian;

import org.jboss.shrinkwrap.api.ShrinkWrap;

import org.jboss.shrinkwrap.api.spec.JavaArchive;

import org.junit.Assert;

import org.junit.Test;

import org.junit.runner.RunWith;

import com.acme.ejb.MessageEcho;

import com.acme.util.jms.QueueRequestor;


@RunWith(Arquillian.class)

public class InjectionTestCase {

   @Deployment

   public static JavaArchive createTestArchive() {

      return ShrinkWrap.create(JavaArchive.class, "test.jar")

         .addClasses(MessageEcho.class, QueueRequestor.class);

   }


   @Resource(mappedName = "/queue/DLQ")

   private Queue dlq;


   @Resource(mappedName = "/ConnectionFactory")

   private ConnectionFactory factory;


   @Test

   public void shouldBeAbleToSendMessage() throws Exception {


      String messageBody = "ping";


      Connection connection = factory.createConnection();

      Session session = connection.createSession(false, Session.AUTO_ACKNOWLEDGE);

      QueueRequestor requestor = new QueueRequestor((QueueSession) session, dlq);


      connection.start();


      Message request = session.createTextMessage(messageBody);

      Message response = requestor.request(request, 5000);


      Assert.assertEquals("Should have responded with same message", messageBody, ((TextMessage) response).getText());

   }

}
That should give you a taste of what Arquillian tests look like. To learn how to setup Arquillian in your application and start developing tests with it, refer to the Chapter 3, Getting started chapter.