We've promised you that integration testing with Arquillian is no more complicated than writing a unit test. Now it's time to prove it to you. In this chapter, we'll look at what is required to setup Arquillian in your project, how to write an Arquillian test case, how to execute the test case and how the test results are displayed. That sounds like a lot, but you'll be writing your own Arquillian tests in no time. (You'll also learn about Chapter 7, Debugging remote tests in Chapter 7).
The quickest way to get started with Arquillian is to add it to an existing Maven 2 project. Regardless of whether you plan to use Maven as your project build, we recommend that you take your first steps with Arquillian this way so as to get to your first green bar with the least amount of distraction.
The first thing you should do is define a Maven property for the version of Arquillian you are going to use. This way, you only have to maintain the version in one place and can reference it using the Maven variable syntax everywhere else in your build file.
<properties>

   <arquillian.version>1.0.0.Alpha4</arquillian.version>

</properties>
Make sure you have the correct APIs available for your test. In this test we are going to use CDI:
<dependency>

   <groupId>javax.enterprise</groupId>

   <artifactId>cdi-api</artifactId>

   <version>1.0-SP1</version>

</dependency>
Next, you'll need to decide whether you are going to write tests in JUnit 4.x or TestNG 5.x. Once you make that decision (use TestNG if you're not sure), you'll need to add either the JUnit or TestNG library to your test build path as well as the corresponding Arquillian library.
If you plan to use JUnit 4, begin by adding the following two test-scoped dependencies to
the <dependencies> section of your pom.xml.
<dependency>

   <groupId>junit</groupId>

   <artifactId>junit</artifactId>

   <version>4.8.1</version>

   <scope>test</scope>

</dependency>


<dependency>

   <groupId>org.jboss.arquillian</groupId>

   <artifactId>arquillian-junit</artifactId>

   <version>${arquillian.version}</version>

   <scope>test</scope>

</dependency>
If you plan to use TestNG, then add these two test-scoped dependencies instead:
<dependency>

   <groupId>org.testng</groupId>

   <artifactId>testng</artifactId>

   <version>5.12.1</version>

   <scope>test</scope>

</dependency>


<dependency>

   <groupId>org.jboss.arquillian</groupId>

   <artifactId>arquillian-testng</artifactId>

   <version>${arquillian.version}</version>

   <scope>test</scope>

</dependency>
That covers the libraries you need to write your first Arquillian test case. We'll revisit the pom.xml file in a moment to add the library you need to execute the test.
You're now going to write your first Arquillian test. But in order to write a test, we need to have something to test. So let's first create a managed bean that we can invoke.
We'll help out those Americans still trying to convert to the metric system by providing them a Fahrenheit to Celsius converter.
Here's our TemperatureConverter:
public class TemperatureConverter {


   public double convertToCelsius(double f) {

      return ((f - 32) * 5 / 9);

   }


   public double convertToFarenheit(double c) {

      return ((c * 9 / 5) + 32);

   }


}
Now we need to validate that this code runs. We'll be creating a test in the src/test/java
classpath of the project.
Granted, in this trivial case, we could simply instantiate the implementation class in a unit test to test the
calculations. However, let's assume that this bean is more complex, needing to access enterprise services. We
want to test it as a full-blown container-managed bean, not just as a simple class instance. Therefore,
we'll inject the bean into the test class using the @Inject annotation.
You're probably very familiar with writing tests using either JUnit or TestNG. A regular JUnit or TestNG test class requires two enhancements to make it an Arquillian integration test:
Define the deployment archive for the test using ShrinkWrap
Declare for the test to use the Arquillian test runner
The deployment archive for the test is defined using a static method annotated with Arquillian's
@Deployment annotation that has the following signature:
public static Archive<?> methodName();
We'll add the managed bean to the archive so that we have something to test. We'll also add an
empty beans.xml file, so that the deployment is CDI-enabled:
@Deployment

public static JavaArchive createTestArchive() {

   return ShrinkWrap.create(JavaArchive.class, "test.jar")

      .addClasses(TemperatureConverter.class)

      .addManifestResource(

            new ByteArrayAsset("<beans/>".getBytes()),

            ArchivePaths.create("beans.xml"));

}
The JUnit and TestNG versions of our test class will be nearly identical. They will only differ in how they hook into the Arquillian test runner.
When creating the JUnit version of the Arquillian test case, you will define at least one test method annotated
with the JUnit @Test annotation and also annotate the class with the
@RunWith annotation to indicate that Arquillian should be used as the test runner for this
class.
Here's the JUnit version of our test class:
@RunWith(Arquillian.class)

public class TemperatureConverterTest {

   @Inject

   private TemperatureConverter converter;


   @Deployment

   public static JavaArchive createTestArchive() {

      return ShrinkWrap.create(JavaArchive.class, "test.jar")

         .addClasses(TemperatureConverter.class)

         .addManifestResource(

            EmptyAsset.INSTANCE,

            ArchivePaths.create("beans.xml"));

   }


   @Test

   public void testConvertToCelsius() {

      Assert.assertEquals(converter.convertToCelsius(32d), 0d);

      Assert.assertEquals(converter.convertToCelsius(212d), 100d);

   }


   @Test

   public void testConvertToFarenheit() {

      Assert.assertEquals(converter.convertToFarenheit(0d), 32d);

      Assert.assertEquals(converter.convertToFarenheit(100d), 212d);

   }

}
TestNG doesn't provide anything like JUnit's @RunWith annotation, so instead the TestNG
version of the Arquillian test case must extend the Arquillian class and define at least one method annotated
with TestNG's @Test annotation.
public class TemperatureConverterTest extends Arquillian {

   @Inject

   private TemperatureConverter converter;


   @Deployment

   public static JavaArchive createTestArchive() {

      return ShrinkWrap.create(JavaArchive.class, "test.jar")

         .addClasses(TemperatureConverter.class)

         .addManifestResource(

            EmptyAsset.INSTANCE,,

            ArchivePaths.create("beans.xml"));

   }


   @Test

   public void testConvertToCelsius() {

      Assert.assertEquals(converter.convertToCelsius(32d), 0d);

      Assert.assertEquals(converter.convertToCelsius(212d), 100d);

   }


   @Test

   public void testConvertToFarenheit() {

      Assert.assertEquals(converter.convertToFarenheit(0d), 32d);

      Assert.assertEquals(converter.convertToFarenheit(100d), 212d);

   }

}
As you can see, we are not instantiating the bean implementation class directly, but rather using the CDI
reference provided by the container at the injection point, just as it would be used in the application. (If
the target container supports EJB, you could replace the @Inject annotation with
@EJB). Now let's
see if this baby passes!
As we've been emphasizing, this test is going to run inside of a container. That means you have to have a container running somewhere. While you can execute tests in an embedded container or a Java SE CDI environment, we're going to start off by testing using the real deal.
If you haven't already, download the latest version of JBoss AS 6.0 from the JBoss AS download page, extract the distribution and start the container.
Since Arquillian needs to perform JNDI lookups to get references to the components under test, we need to
include a jndi.properties file on the test classpath. Create the file
src/test/resources/jndi.properties and populate it with the following contents:
java.naming.factory.initial=org.jnp.interfaces.NamingContextFactory
java.naming.factory.url.pkgs=org.jboss.naming:org.jnp.interfaces
java.naming.provider.url=jnp://localhost:1099
Next, we're going to return to pom.xml to add another dependency. Arquillian picks which container it's going
to use to deploy the test archive and negotiate test execution using the service provider mechanism, meaning
which implementation of the DeployableContainer SPI is on the classpath. We'll control
that through the use of Maven profiles. Add the following profiles to pom.xml:
<profiles>

   <profile>

      <id>jbossas-remote-6</id>

      <dependencies>

         <dependency>

            <groupId>org.jboss.arquillian.container</groupId>

            <artifactId>arquillian-jbossas-remote-6</artifactId>

            <version>${arquillian.version}</version>

         </dependency>

        <dependency>

            <groupId>org.jboss.jbossas</groupId>

            <artifactId>jboss-as-client</artifactId>

            <version>6.0.0.20100721-M4</version>

            <type>pom</type>

        </dependency>

      </dependencies>

   </profile>

</profiles>
You would setup a similar profile for each Arquillian-supported container in which you want your tests executed.
All that's left is to execute the tests. In Maven, that's easy. Simply run the Maven test goal with the
jbossas-remote-6 profile activated:
mvn test -Pjbossas-remote-6
You should see that the two tests pass.
-------------------------------------------------------
 T E S T S
-------------------------------------------------------
Running TemperatureConverterTest
Tests run: 2, Failures: 0, Errors: 0, Skipped: 0, Time elapsed: 1.964 sec

Results :

Tests run: 2, Failures: 0, Errors: 0, Skipped: 0

[INFO] ------------------------------------------------------------------------
[INFO] BUILD SUCCESSFUL
[INFO] ------------------------------------------------------------------------
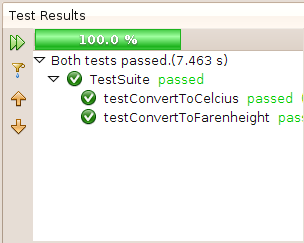
The tests are passing, but we don't see a green bar. To get that visual, we need to run the tests in the IDE. Arquillian tests can be executed using existing IDE plugins for JUnit and TestNG, respectively, or so you've been told. It's once again time to prove it.
Before running an Arquillian test in Eclipse, you must have the plugin for the unit testing framework you are using installed. Eclipse ships with the JUnit plugin, so you are already setup if you selected JUnit. If you are writing your tests with TestNG, you need the Eclipse TestNG plugin.
Note
Since the example in this guide is based on a Maven 2 project, you will also need the m2eclipse plugin. Instructions for using the m2eclipse update site to add the m2eclipse plugin to Eclipse are provided on the m2eclipse home page. For more, read the m2eclipse reference guide.
Once the plugins are installed, import your Maven project into the Eclipse workspace. Before executing the
test, you need to enable the profile for the target container, as you did in the previous section. We'll
go ahead and activate the profile globally for the project. Right click on the project and select Properties.
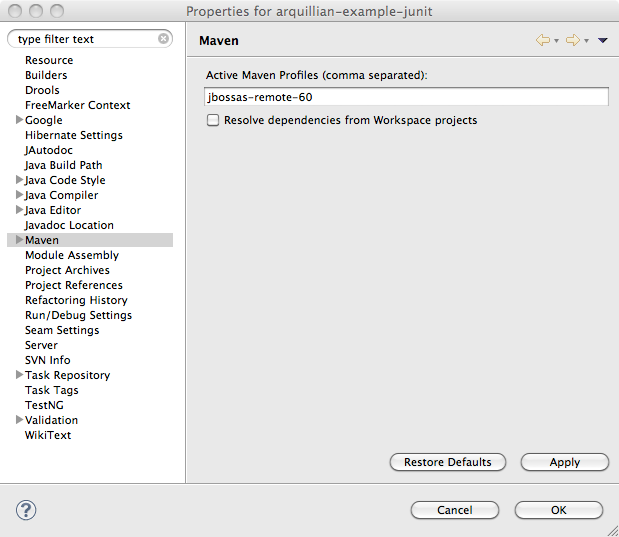
Select the Maven property sheet and in the first form field, enter jbossas-remote-6; you also need
to tell Maven to not resolve depedencies from the workspace (this interferes with resource loading):

Maven settings for project
Click OK and accept the project changes. Before we execute tests, make sure that Eclipse has properly processed all the resource files by running a full build on the project by selecting Clean from Project menu. Now you are ready to execute tests.
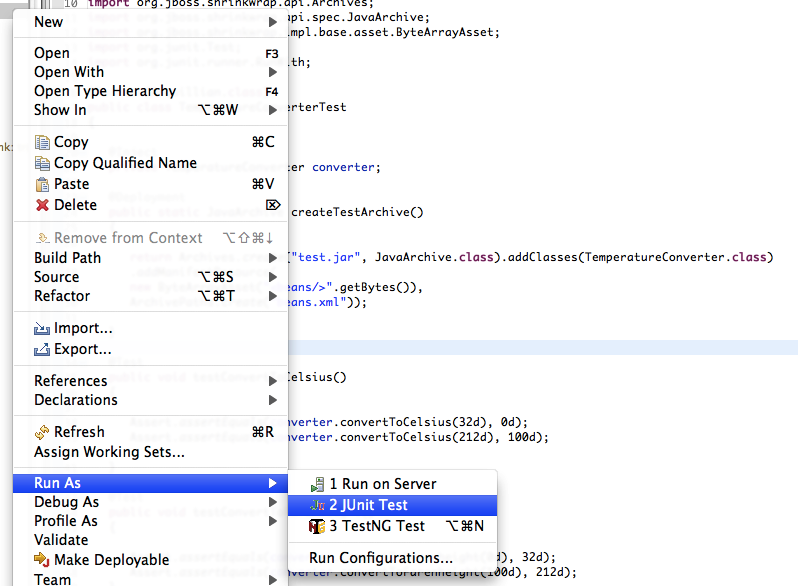
Right click on the TemperatureConverterTest.java file in the Package Explorer and select Run As... > JUnit Test or Run As... > TestNG Test depending on which unit testing framework the test is using.

Running the the JUnit test in Eclipse
Things get even simpler when using NetBeans 6.8 or better. NetBeans ships with native Maven 2 support and, rather than including a test plugin for each unit testing framework, it has a generic test plugin which delegates to the Maven surefire plugin to execute the tests.
Import your Maven project into NetBeans. Then, look for a select menu in the main toolbar, which you can
use to set the active Maven profile. Select the jbossas-remote-6 profile as shown here:

NetBeans project configuration
Now you are ready to test. Simply right click on the TemperatureConverter.java file in the Projects pane and select Test File. NetBeans will delegate to the Maven surefire plugin to execute the tests and then display the results in a result windown, showing us a pretty green bar!

Successful test report in NetBeans
As you can see, there was no special configuration necessary to execute the tests in either Eclipse or NetBeans.